Getting a smooth finish with spray paint is the difference between a project that looks store-bought and one that looks like a rushed Saturday afternoon mistake. Drips, orange peel texture, brush-like streaks, and uneven coverage — these are not signs of bad luck. They are the result of skipping steps that every experienced spray painter knows are non-negotiable.
The good news? Getting a perfectly smooth finish with spray paint is not difficult once you understand exactly what causes rough results and how to prevent them. This complete guide walks you through every stage — from choosing the right product and preparing your surface to applying paint with the correct technique and achieving a showroom-quality topcoat.
Whether you are painting furniture, metal, wood, plastic, or any other surface, the principles in this guide apply across the board.
Table of Contents
- Why Spray Paint Finish Goes Wrong
- Choosing the Right Spray Paint for a Smooth Finish
- Surface Preparation: The Most Important Step
- Environmental Conditions That Affect Your Finish
- How to Hold and Move the Can Correctly
- The Right Spray Distance for a Smooth Finish
- How Many Coats to Apply (And How Long to Wait)
- How to Sand Between Coats
- Applying a Clear Topcoat for Maximum Smoothness
- How to Fix Common Finish Problems
- Quick Reference: Smooth Finish Checklist
1. Why Spray Paint Finish Goes Wrong
Before diving into technique, it helps to understand the root causes of a bad spray paint finish. Most problems fall into one of these categories:
- Incorrect distance — Holding the can too close causes drips and runs. Too far causes dry, powdery, uneven coverage.
- Skipping primer — Without a proper primer, the topcoat sits unevenly on the surface and is more prone to peeling and texture problems.
- Poor surface prep — Dust, grease, and old loose paint all prevent the new paint from bonding cleanly.
- Wrong environmental conditions — Spraying in high humidity, cold temperatures, or direct sunlight ruins finishes in ways that are almost impossible to fix after the fact.
- Applying too much paint at once — This is the single most common mistake beginners make. Thin coats always produce smoother results than thick ones.
Understanding these causes means you can address them before they happen, not after your project is ruined.
2. Choosing the Right Spray Paint for a Smooth Finish
The type of spray paint you choose has a significant impact on the final smoothness of your finish. Not all spray paints are designed to produce the same result.
Acrylic Spray Paint
Acrylic is the most popular all-purpose option. It dries quickly, flows well, and produces a smooth, consistent finish on most surfaces including wood, metal, and plastic. It is the best starting point for most DIY projects.
Enamel Spray Paint
Enamel self-levels as it dries, which means it naturally smooths out minor imperfections in your application. This makes it an excellent choice when a glass-smooth finish is the priority. It takes longer to cure but the results are noticeably more professional.
Chalk and Matte Paints
These paints are formulated to produce a flat, textured finish by design. If your goal is a smooth result, avoid chalk-finish formulations unless you plan to seal them with a satin or gloss topcoat.
Paint + Primer in One vs. Separate Primer
Two-in-one paint-and-primer products are convenient but rarely produce as smooth a result as applying a proper dedicated primer first and then painting over it. For any project where smoothness matters, use a separate primer coat.
For a full breakdown of which product works best for each surface, see our guide: How to Choose the Right Spray Paint for Any Project.
3. Surface Preparation: The Most Important Step
If you want to know how to get a smooth finish with spray paint, the answer always starts with preparation. No technique in the world compensates for a poorly prepared surface.
Step 1: Clean the Surface Thoroughly
Remove all dust, grease, oil, and dirt. Use a tack cloth or lint-free rag with rubbing alcohol or acetone (on surfaces that can tolerate it) to degrease. Even fingerprints from handling the piece can cause adhesion problems.
Step 2: Sand the Surface
For bare wood, start with 120-grit sandpaper to remove any mill marks or roughness, then follow with 180-grit for a smoother base. For already-painted surfaces, scuff sand with 220-grit to give the new paint something to grip.
Always sand in the direction of the grain on wood. Wipe away all sanding dust with a tack cloth before moving to the next step.
Step 3: Fill Any Imperfections
Dents, holes, scratches, and grain in open-pored woods will all telegraph through your spray paint finish. Use a lightweight filler or wood filler, let it dry completely, and sand it flush and smooth.
Step 4: Apply Primer
Primer is not optional when a smooth finish is the goal. It seals the surface, evens out porosity, and gives the topcoat an ideal surface to bond with.
- Use a grey primer for dark or deeply stained surfaces
- Use a white primer for light colours
- Use a bonding primer for plastic, glass, or any surface the paint is unlikely to adhere to naturally
Apply primer in thin, even coats — the same technique applies as for the topcoat. Allow it to dry fully, then sand lightly with 220-grit sandpaper before applying your colour coat.
For surface-specific prep details, these guides go deeper:
- How to Spray Paint Wood: The Complete Guide to a Smooth, Professional Finish
- How to Spray Paint Metal: The Complete Guide (Prep, Paint, and Lasting Results)
- How to Spray Paint Plastic: The Complete Guide to a Finish That Actually Sticks
4. Environmental Conditions That Affect Your Finish
Temperature and humidity are two of the most underestimated factors in spray painting. Getting both wrong can ruin a finish even when your technique is perfect.
Temperature
The ideal temperature range for spray painting is 60°F to 85°F (15°C to 30°C). Below 50°F (10°C), the paint becomes more viscous, applies unevenly, and takes significantly longer to dry. Above 90°F (32°C), the paint dries before it has time to self-level, resulting in a rough, orange-peel texture.
Humidity
High humidity (above 70%) causes problems in two ways: it can introduce moisture into the finish, causing blushing (a milky, hazy look in clear coats) or bubbling. It also slows drying time significantly. Ideal relative humidity for spray painting is between 40% and 60%.
Wind and Direct Sunlight
Avoid spraying in wind — it carries dust onto wet paint and dries your finish unevenly. Direct sunlight heats the surface rapidly, causing the paint to skin over before it has levelled properly. Paint in a shaded, well-ventilated area whenever possible.
For outdoor projects specifically, see our detailed guide: How to Spray Paint Outdoors: Tips for Weatherproof Results.
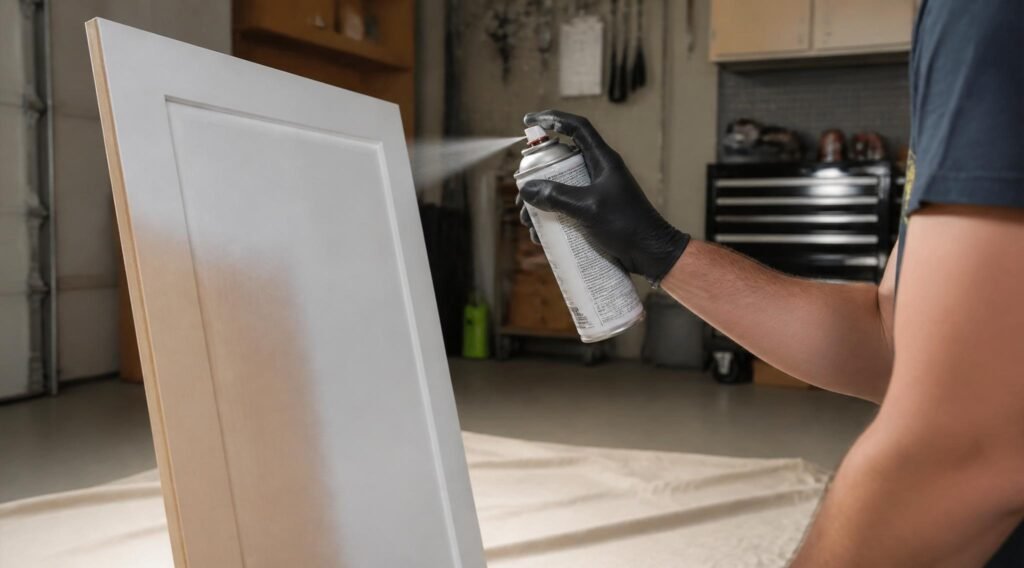
5. How to Hold and Move the Can Correctly
This is where most of the technique lives. Knowing how to move the can makes the single biggest difference in whether you get a smooth finish or a streaky, uneven one.
Keep the Can Perpendicular to the Surface
Always hold the can at a 90-degree angle to the surface. Tilting the can to the side causes uneven paint distribution, with more paint building up on one edge of the spray pattern.
Use Smooth, Steady Arm Movements
Move your entire arm from the shoulder — not just the wrist. Wrist pivoting creates an arc motion that results in more paint at the centre of each pass and less at the edges. Straight, consistent arm movements deposit paint evenly across the entire surface.
Begin and End Each Pass Off the Surface
Start moving the can before you press the nozzle, and release the nozzle before you stop moving at the end of each pass. This prevents heavy spots building up at the start and end of each stroke, which is one of the most common causes of drips.
Overlap Each Pass by 50%
Each horizontal or vertical pass should overlap the previous one by approximately half the width of the spray pattern. This ensures consistent coverage without any dry gaps between passes.
6. The Right Spray Distance for a Smooth Finish
Spray distance is one of the most critical variables in getting a smooth finish with spray paint, and it varies slightly depending on the product and the nozzle type.
The Standard Rule: 10–12 Inches (25–30 cm)
For most standard aerosol spray paints, holding the can 10 to 12 inches from the surface produces the best balance between flow and coverage. At this distance, the paint droplets are well-atomised but still wet enough to flow together smoothly on the surface.
When to Adjust Distance
- Move closer (8 inches): When doing final finish coats with fast-drying paint and you want maximum flow and levelling. Use with extra care to avoid runs.
- Move further (14–16 inches): When applying the very first light coat over a bare surface, or when using a wide-fan nozzle on a large flat area.
Test on Cardboard First
Before spraying your actual project, always test your spray pattern and distance on a piece of cardboard. This lets you see exactly how the paint is laying down, check for any issues with the nozzle, and confirm your distance is correct.
7. How Many Coats to Apply (And How Long to Wait)
One of the most reliable rules in spray painting is this: thin coats always beat thick coats. Multiple thin coats produce a smoother, more durable finish than one or two heavy coats.
The Standard Approach
- Primer: 1–2 thin coats, sanding lightly with 220-grit between coats and after the final primer coat
- Colour coat: 2–3 thin coats
- Topcoat/sealer: 1–2 thin coats if desired
How Long to Wait Between Coats
Waiting times vary by product, but a general guide:
- Touch dry (recoat window): 10–20 minutes for most aerosols
- Hard dry: 1–2 hours
- Full cure: 24–72 hours depending on product
Always check the label on your specific product. Applying the next coat too early, while the previous coat is still soft, causes texture problems including lifting, wrinkles, and fish-eye. Waiting too long past the recoat window (without scuff sanding) means the layers may not bond properly.
8. How to Sand Between Coats
Wet sanding and dry sanding between coats is one of the most effective ways to achieve a glass-smooth spray paint finish. It removes any dust nibs, minor orange peel, and texture from the dried coat before the next one goes on.
Dry Sanding Between Coats
Use 320-grit to 400-grit sandpaper between colour coats. Sand lightly — you are smoothing the surface, not stripping the paint. Wipe away all dust with a tack cloth before the next coat.
Wet Sanding the Final Coat
For a truly smooth, high-gloss result, wet sand the final dried topcoat with 600-grit wet-or-dry sandpaper using water. Work in small, circular motions. Follow with 800-grit, then 1000-grit if you want a mirror finish. Dry the surface completely, then buff with a polishing compound.
What Not to Sand
Do not sand a metallic or glitter finish — this destroys the special-effect particles that create the shimmer. These finishes should be sealed with a clear gloss topcoat instead of sanded.
9. Applying a Clear Topcoat for Maximum Smoothness
A clear topcoat does two things: it protects the colour coat from scratches, UV damage, and moisture, and it can significantly enhance the smoothness and depth of the finish.
Gloss Topcoat
Gloss topcoats produce the smoothest, most reflective finish. They amplify the depth of the colour beneath. This is the best choice for furniture, decorative items, and any project where maximum smoothness is the goal.
Satin Topcoat
Satin (also called semi-gloss) produces a soft sheen that is smooth but not reflective. It is very practical for surfaces that are regularly handled, since fingerprints show less than on high gloss.
Matte/Flat Topcoat
Matte topcoats seal and protect without adding any sheen. They will not make the underlying colour coat appear smoother — they simply lock it in and protect it.
Application Tips for Topcoats
- Apply in the same thin-coat method as the colour coats
- Allow the final colour coat to dry completely before applying the topcoat (minimum 24 hours for hard dry)
- Two thin topcoat applications produce better results than one thick one
10. How to Fix Common Finish Problems
Even with good preparation and technique, problems occasionally happen. Here is how to address the most common spray paint finish issues.
Drips and Runs
Let the drip dry completely — do not try to wipe it while wet, as this spreads the problem. Once dry, sand the drip flat with 320-grit sandpaper and blend it into the surrounding area. Apply a fresh thin coat over the sanded area.
Orange Peel Texture
Orange peel (the bumpy texture that resembles the skin of an orange) is caused by paint drying too fast before it can level out. It happens most commonly in hot weather or when spraying from too far away. To fix it, wet sand with 800-grit to 1000-grit sandpaper, clean the surface, and apply a fresh coat in better conditions.
Rough, Dusty Surface (Dry Spray)
This happens when the spray distance is too great and the paint partially dries before hitting the surface. Sand the rough area with 400-grit, clean well, and reapply from the correct distance.
Fisheye (Craters in the Finish)
Fisheyes are caused by contamination — usually oil, silicone, or wax on the surface. You need to strip the affected area, clean it thoroughly with a degreaser, and start again.
Uneven Coverage / Patchy Colour
Usually caused by applying paint too thinly or missing overlaps between passes. Apply an additional thin coat with proper 50% overlap technique.
For a comprehensive troubleshooting breakdown, read our dedicated guide: 10 Common Spray Paint Mistakes (And How to Fix Every One of Them).
11. Quick Reference: Smooth Finish Checklist
Before you start any spray painting project, run through this checklist to maximise your chances of getting a smooth finish the first time.
Preparation
- Surface cleaned and degreased
- Surface sanded and any imperfections filled
- All dust wiped away with a tack cloth
- Primer applied, dried, and lightly sanded
Environment
- Temperature between 60°F and 85°F (15°C–30°C)
- Humidity below 70%
- Working in shade, out of direct wind
Technique
- Can shaken for 2 full minutes
- Test spray done on cardboard first
- Holding can 10–12 inches from surface
- Moving can from shoulder, not wrist
- Beginning and ending each pass off the surface
- Each pass overlapping previous by 50%
- Applying thin coats only
Finishing
- Sanding lightly between coats with 320–400 grit
- Final colour coat allowed to dry before topcoat
- Clear topcoat applied for protection and smoothness
Final Thoughts
Knowing how to get a smooth finish with spray paint is ultimately about discipline and preparation more than it is about talent or expensive equipment. The painters who consistently produce professional-looking results are the ones who do not rush prep, do not try to cover in one thick coat, and do not skip the sanding steps.
The techniques in this guide apply whether you are painting a piece of furniture, a set of metal shelves, a plastic garden chair, or a complete car panel. The surface changes; the fundamentals do not.
If you are ready to take on your first big project, a great place to start is our How to Spray Paint Furniture: The Complete Beginner’s Guide to a Perfect Finish — it applies everything in this guide to a real, practical project with step-by-step instructions.
Always remember to protect yourself while you work. For everything you need to know about protective equipment and safe spray painting practices, read our full Spray Painting Safety Guide.
Happy painting.