How to Spray Paint Wicker and Rattan Furniture: Complete Guide (2026)
By Rodney Shiner | DIY Projects & Ideas | Updated July 2026
Reading Time: ~13–15 minutes
Wicker and rattan furniture ages in a very specific way — the weave stays structurally fine long after the finish has gone dull, chalky, or yellowed. That gap between “still sturdy” and “looks worn out” is exactly why wicker is one of the most rewarding pieces of furniture to refresh with spray paint: a chair or settee that looks ready for the curb can look brand new again for the cost of a couple of cans and a single afternoon of focused work.
Wicker also behaves nothing like the flat panels covered in our general furniture spray painting guide — the entire challenge here is coverage into hundreds of small gaps, curves, and overlapping weave points, where brush painting is genuinely impractical and spray paint is the clearly better tool. This guide covers the material differences between natural and synthetic wicker, prep, technique for full weave coverage, and the durability steps that matter most for furniture that often lives outdoors.
“Wicker” technically describes a weaving method rather than a material — it can be woven from natural rattan, willow, or bamboo, or from synthetic resin fibers designed to mimic the look. Since natural and synthetic wicker need different prep and take paint differently, identifying which one you have is the first real decision in this project.
Natural Wicker/Rattan vs. Synthetic Resin Wicker
| Type | How to Identify | Paint Approach |
| Natural rattan/wicker | Slightly rough, organic texture; may show small splinters or natural color variation | Absorbs paint like wood; needs sealing afterward for durability |
| Synthetic resin wicker | Uniform, slightly glossy texture; consistent color and thickness throughout | Behaves like plastic; needs adhesion promoter or bonding primer |
| Painted/finished wicker (either type) | Existing paint or varnish visible on the surface | Needs scuff-sanding and possibly stripping before new paint, regardless of base material |
If you’re not sure which you have, a light sand in an inconspicuous spot tells you quickly — natural rattan sands to a dusty, fibrous residue, while synthetic resin sands to a fine plastic-like powder and often feels slightly warmer or more flexible to the touch than natural fiber.
Step 1: Clean Thoroughly Before Doing Anything Else
Wicker’s woven structure traps dust, pollen, and grime deep in the gaps between strands in a way flat furniture never does, and any of it left behind will show through your finish or, worse, prevent paint from bonding properly in those recessed areas.
- Vacuum the entire piece first with a soft brush attachment to remove loose dust and debris from every gap in the weave.
- Wash with warm soapy water and a soft-bristled brush (an old toothbrush works well for tight weave gaps), scrubbing into every crevice rather than just wiping the surface.
- Rinse thoroughly and let the piece dry completely for at least 24–48 hours before proceeding — trapped moisture inside a tight weave takes far longer to evaporate than it looks like it should, especially on natural rattan.
Step 2: Repair Before You Prep
- Loose or frayed natural wicker strands: soak the specific area in warm water for 15–20 minutes to make the fiber pliable again, then re-weave or tuck it back into place and let it dry fully before sanding.
- Cracked or split synthetic resin strands: these generally can’t be re-woven successfully; small cracks can sometimes be glued with a flexible adhesive, but significantly damaged sections are usually better replaced than repaired.
- Loose joints where the weave meets a wood or metal frame: secure with wood glue or an appropriate adhesive for the frame material and let it fully cure before moving to paint.
Step 3: Light Sanding (Skip for Some Synthetic Wicker)
- Natural wicker with an existing finish: lightly sand with 220-grit sandpaper to dull the old finish and give new paint something to grip — you don’t need to remove all the old color, just break the glossy surface.
- Bare, unfinished natural wicker: sanding is optional but helps knock down any rough fibers or splinters before painting.
- Synthetic resin wicker: skip sanding on smooth, unfinished resin — it can create a rough, fuzzy texture that’s hard to smooth back out. Instead, rely on a bonding primer or adhesion promoter formulated for plastic to handle the grip problem.
- Previously painted synthetic wicker: a very light scuff with a fine sanding sponge (not sandpaper, which can gouge softer resin) is usually enough.
Step 4: Primer — When You Need It and What Kind
Natural wicker generally doesn’t need primer if you’re using a paint labeled for wood and wicker use, since it absorbs paint similarly to raw wood. Synthetic resin wicker behaves like the plastic covered in our plastic spray painting guide — a bonding primer or dedicated adhesion promoter for plastic is close to essential here, since standard paint alone tends to chip and peel off smooth resin within a season without it.
Whichever primer you use, apply it in thin, deliberate passes and expect to use more product than a similarly-sized flat piece of furniture — wicker’s surface area, once you account for every strand and gap, is dramatically larger than its outward dimensions suggest.
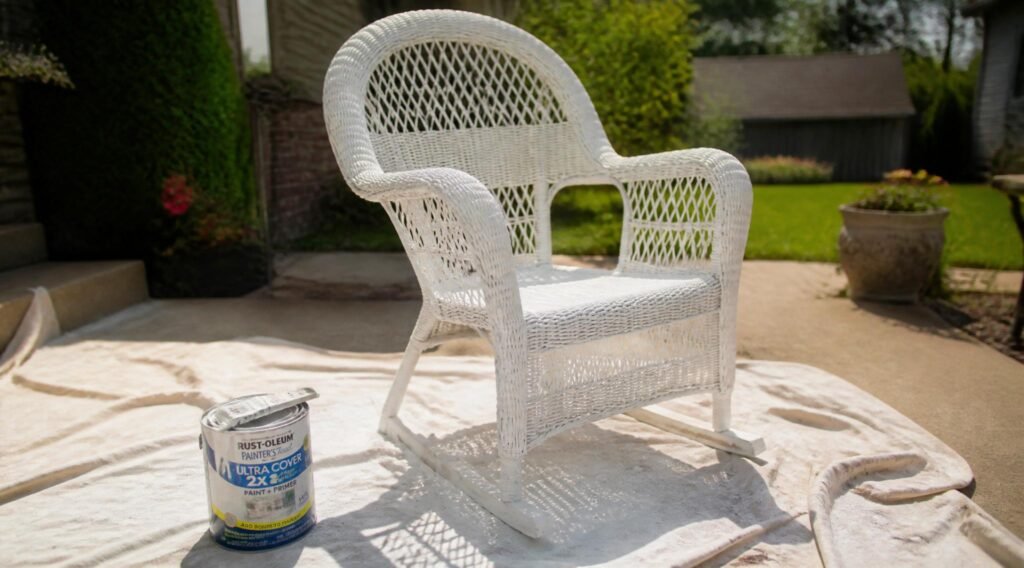
Step 5: Choosing Your Paint
- For indoor wicker: a standard multi-surface spray paint or a paint labeled for wood and wicker works well and gives you the widest color selection.
- For outdoor or patio wicker: choose a paint specifically labeled for outdoor use with UV and weather resistance — this matters enormously for anything that lives outside, since standard indoor formulas fade and chalk quickly under direct sun.
- For synthetic resin wicker specifically: a flexible spray paint formulated for plastic holds up better long-term than a rigid enamel, since resin wicker flexes slightly under weight and rigid paint is more prone to cracking at stress points over time.
Step 6: The Application Technique That Actually Covers a Weave
This is where wicker genuinely differs from every other project on this site. Standard technique — as covered in our spray painting tips guide — still applies for distance and coat thickness, but full weave coverage needs a specific approach on top of those basics.
- Spray from multiple angles — directly on, then from the left, right, above, and below each section — since a single straight-on pass leaves the undersides of overlapping weave strands completely uncoated.
- Work in smaller sections rather than trying to cover a whole chair in one pass, since keeping track of which angles you’ve covered gets difficult once you’re several feet into a large piece.
- Use a slightly closer spray distance than flat-surface work, around 6–8 inches, since wicker’s uneven surface disperses paint less predictably than a flat panel.
- Elevate the piece off the ground on blocks or a stand so you can angle spray up into the underside of seats and weave gaps near the base — this is the area most commonly left undercoated.
- Plan on more coats than you’d expect for a solid-surface piece — 3–5 thin passes is common for full, even coverage of a tightly woven piece, compared to 2–3 for a flat panel.
Checking for Missed Spots
Once a coat has flashed off (but before it’s fully dry), walk around the piece and check from multiple angles under good light — missed spots in a weave show up as small gaps of the old color or bare material peeking through, and they’re far easier to catch and correct between coats than after the piece is fully cured and reassembled into its final spot.
Pay particular attention to tightly woven curves, the underside of arms and seats, and anywhere multiple strands cross over each other — these are the spots that consistently get missed on a first pass, on both natural and synthetic wicker, and they’re also the spots most visible to anyone actually sitting in or using the finished piece.
Drying and Curing Time
Touch-dry typically happens within 20–30 minutes, but full cure for wicker projects tends to run slightly longer than flat furniture — often 3–5 days — simply because the woven structure holds onto solvent vapor longer than a flat surface does. Avoid sitting on or leaning against a freshly painted piece until it’s fully cured, since indentations from weight can actually show in a still-soft finish in ways that don’t happen on hard, flat wood.
Step 7: Seal for Durability (Especially Outdoors)
A clear topcoat isn’t always necessary on indoor decorative wicker, but it’s genuinely valuable on anything used regularly or kept outdoors. Our clear coat guide covers gloss, satin, and matte finish options — for outdoor wicker specifically, look for a UV-protective clear coat, since sun exposure is what most commonly degrades painted wicker finishes over a season or two of outdoor use.
Caring for Painted Wicker Long-Term
- Bring outdoor wicker under cover or indoors during harsh weather when possible — even weather-resistant paint benefits from reduced direct exposure.
- Wipe down with a soft brush or cloth periodically to prevent dust and pollen from re-accumulating deep in the weave.
- Touch up small chips as soon as you notice them, since exposed bare wicker at a chip site absorbs moisture and can lead to more significant peeling around the damaged spot over time.
- Reapply a UV-protective clear coat every year or two on outdoor pieces to maintain both appearance and protection as the original topcoat gradually weathers.
Painting Wicker Baskets and Smaller Accent Pieces
The same principles scale down well to smaller woven items — storage baskets, plant stands, decorative trays, and lampshades. Smaller pieces are genuinely more forgiving for a first attempt, since the multi-angle spraying technique is easier to manage on something you can rotate in your hands rather than a full-size chair you have to walk around.
Small woven baskets used for storage benefit from the same UV-protective clear coat if they’ll sit near a sunny window, and from a food-safe consideration similar to painted glass or ceramic if they’ll ever hold produce or food items directly rather than packaged goods. As with larger furniture, plan on more coats than instinct suggests, since a basket’s tight weave hides gaps just as effectively as a full-size chair’s does.
Troubleshooting Common Problems
Bubbling, especially on natural rattan, is almost always caused by moisture trapped in the fiber from incomplete drying after washing — our guide on why spray paint bubbles covers the underlying cause, and on wicker the fix is usually extending your dry time significantly before painting rather than a prep or technique issue.
Drips pooling at the bottom of curved sections are common on wicker, since gravity pulls excess paint toward the lowest point of every curve in the weave. Our guide to fixing spray paint drips and runs covers the sand-and-recoat process, though on tight weave gaps a small detail brush is sometimes more practical than sandpaper for touch-ups.
Patchy or uneven coverage after multiple coats usually means the multi-angle spraying step was skipped — go back over the piece checking specifically from below and at sharp angles into the weave, rather than adding more straight-on coats that will only build up further on the already-covered outer surfaces.
Color and Style Trends for Painted Wicker
Warm white and soft cream have remained the most popular colors for painted wicker through 2026, favored for how well they brighten a space without looking stark, and for how forgiving they are of the small imperfections and texture variation natural wicker often has. Sage green and terracotta-adjacent warm tones have also grown popular for outdoor pieces, pairing well with the greenery typically surrounding patio furniture.
Dark, moody colors — charcoal, deep navy, black — work particularly well on synthetic resin wicker, where the smoother surface holds a more uniform, saturated color than natural fiber tends to. If you’re repainting a full set, sticking to one color family across every piece reads as far more intentional than mixing several different shades, even close ones, across a multi-piece set.
Working With Painted or Powder-Coated Metal Frames
Many wicker chairs and sofas are built around a metal frame that’s visible at the legs, arms, or base. If that frame has its own existing paint or powder coat and you want it to match your new wicker color, treat it as a separate metal project — scuff-sand any glossy factory finish, spot-treat any rust, and use a metal-appropriate primer before color, rather than assuming the same wicker-focused paint and technique will adhere the same way to a painted metal surface.
If the frame is in good condition and you’re happy with its existing color or finish, mask it off carefully before spraying the wicker sections — metal frames are usually smoother and less forgiving of overspray drift than the woven sections, so a slightly more careful masking job here pays off in the final look.
Should You Use a Spray Gun for Large Wicker Sets?
For a full patio set — multiple chairs plus a settee — some painters step up from aerosol cans to an HVLP spray gun for better material efficiency across a larger volume of work. Our guide to spray gun types covers the tradeoffs, though for a single chair or small accent piece, aerosol cans remain the simpler and more practical choice given the multi-angle spraying wicker requires.
Combining Wicker With Wood or Glass Accents
Many wicker pieces include wood trim, frames, or glass tabletop inserts. If your piece has wood accents, our wood spray painting guide covers the different prep those sections need. If there’s a glass insert you’d like to refresh alongside the frame, our glass spray painting guide covers that separately, since glass and wicker take completely different prep and paint approaches.
Quick-Reference Checklist
- Identify natural vs. synthetic wicker before choosing prep and primer
- Vacuum and wash thoroughly, then dry fully for 24–48 hours
- Repair loose weave, cracks, or joints before painting
- Sand natural wicker lightly; skip or minimize sanding on smooth synthetic resin
- Prime synthetic resin wicker with a plastic-specific bonding primer
- Choose outdoor/UV-rated paint for anything kept outside
- Spray from multiple angles — top, sides, and underneath — for full weave coverage
- Plan on 3–5 thin coats rather than the 2–3 typical for flat furniture
- Allow 3–5 days full cure before regular use
- Seal with a UV-protective clear coat for outdoor pieces
Budgeting Time and Materials
A single wicker chair typically needs 2–3 cans of color, plus primer if you’re working with synthetic resin, and a clear coat if the piece will live outdoors — running roughly $25–$45 in materials for most single-chair projects. A full patio set of four to six pieces scales up proportionally and is still meaningfully cheaper than replacement furniture in a similar style, even accounting for the extra paint and primer a larger set requires.
Time-wise, budget a full day per piece when you count cleaning and drying time before you even start painting — the 24–48 hour dry window after washing is the part people most often underestimate, and skipping ahead of it is one of the most common causes of bubbling on this specific project.
Frequently Asked Questions
Can you spray paint wicker furniture without taking it apart?
Yes, and in most cases you should — wicker is generally painted as a whole assembled piece rather than disassembled, unlike some other furniture projects. The multi-angle spraying technique in this guide is designed specifically for painting a fully assembled woven piece.
How do you know if wicker furniture is worth repainting versus replacing?
If the weave itself is structurally sound with only minor loose strands here and there, painting is almost always worth it and far cheaper than replacement. If there’s widespread breakage, significant rot in natural fiber, or large sections of missing weave, replacement is usually the better investment.
Does spray paint work on outdoor wicker that’s been left in the sun for years?
Yes, as long as the weave itself hasn’t become brittle or cracked from UV damage. Clean thoroughly, address any chalky residue on the surface, and use a UV-resistant outdoor paint and clear coat for the best long-term result.
How many cans of spray paint does a wicker chair typically need?
Plan for roughly 2–3 cans for a single chair, given wicker’s larger effective surface area and the multiple coats needed for full weave coverage — noticeably more than you’d use on a similarly-sized solid wood piece.
Can you change synthetic resin wicker to a completely different color?
Yes, with the right prep. Skip aggressive sanding, use a bonding primer or adhesion promoter formulated for plastic, and choose a flexible paint made for synthetic materials rather than a rigid enamel, which is more prone to cracking on resin’s slightly flexible surface.
Is it better to spray paint or hand-paint a brush over wicker furniture?
Spray paint is almost always the better choice for wicker specifically, since a brush struggles to reach the undersides and crossing points of a tight weave the way an aerosol mist can. Reserve hand-brushing for small touch-ups after the main spray project, not the primary application method.
Final Thoughts
Wicker rewards a different kind of patience than most spray paint projects — less about one perfect heavy coat and more about methodically working every angle of a complex woven surface until nothing’s left uncovered. Clean thoroughly, identify your material correctly, prime appropriately, and commit to the multi-angle spraying technique, and a tired, sun-bleached piece can look genuinely new again for a fraction of what a replacement would cost.
Start with a single chair before tackling a full patio set — the technique has a real learning curve specific to weave coverage, and your second piece will go noticeably faster and look more even than your first.
Once you’ve got the multi-angle spraying approach down, it transfers directly to any other woven or textured surface you tackle in the future, whether that’s another wicker piece, a basket, or any project where a flat, single-direction spray pass simply won’t reach every surface that needs coverage.