By Rodney Shiner | DIY Projects & Ideas | Updated July 2026
Reading Time: ~14–16 minutes
Nothing dates a car faster than tired, curbed, or chalky-looking wheels — and nothing refreshes a car’s whole appearance faster than a clean set of freshly finished rims. It’s also one of the most searched-for DIY automotive projects out there, for good reason: professional wheel refinishing or powder coating typically runs several hundred dollars for a set of four, while a well-executed spray paint job costs a fraction of that and can genuinely hold up for years of regular driving.
Wheels are also one of the least forgiving surfaces to rush. They’re structural, safety-relevant components exposed to road salt, brake dust, heat from braking, and constant curb and debris impact — conditions that will expose any shortcut in prep or paint choice within a single season. This guide covers removal, prep, priming by wheel material, paint and clear coat selection, and the durability details that separate a wheel job that lasts through winters from one that’s peeling by spring, whether you’re refreshing a daily driver or prepping a project car for a full cosmetic overhaul.
Much of the underlying process follows the same logic as our metal spray painting guide, since most wheels are steel, aluminum, or an aluminum alloy — but wheels carry their own specific risks around heat, structural surfaces, and safety that this guide addresses directly.
Working Around TPMS Sensors and Balancing Weights
Most vehicles built in the last two decades have TPMS (tire pressure monitoring system) sensors mounted inside the wheel, usually attached to the valve stem or strapped to the wheel band. Mask these carefully rather than removing them unless you’re confident about reinstallation — overspray on the sensor body itself is rarely a functional problem, but disturbing its mounting can cause pressure reading issues later.
Wheel balancing weights, whether the clip-on type on the wheel lip or adhesive weights on the inner barrel, should be removed before painting if possible and reinstalled or reapplied after the wheel is fully cured and reinstalled. Painting over old adhesive weights traps them under the new finish and makes rebalancing after your paint job unnecessarily difficult.
A Safety Note Before You Start
Wheels are structural parts, not just decorative ones. Never apply paint, filler, or coating to the mounting surface where the wheel contacts the hub, or to the surfaces directly under the lug nuts — a buildup of paint in these areas can affect torque retention and, over time, wheel security. This is the one part of this guide that isn’t a suggestion: mask these surfaces completely and keep them paint-free, every time.
Step 1: Remove the Wheels
Painting wheels while still mounted on the car is possible in a pinch, but the results are noticeably worse and the risk of overspray on your car’s paint, brake components, and tires is high. Removing the wheels entirely gives you full access to every surface, including the inner barrel, which is where a lot of the visible detail shows through open-spoke wheel designs.
- Safely jack up the car and support it on jack stands rated for the vehicle’s weight — never work under a car supported only by a jack.
- Remove all four wheels if you’re doing the full set, which also lets you work through them one at a time while the others dry.
- Set each wheel on a stand, an old tire, or blocks so you can rotate and access it fully without touching a freshly coated surface.
Step 2: Deep Clean and Degrease
Wheels accumulate brake dust, road grime, tar, and baked-on brake residue that ordinary car wash soap won’t fully remove — and any of it left behind will show through your primer and shorten the life of the finish.
- Use a dedicated wheel cleaner or degreaser and a stiff brush to get into every spoke gap and lug hole, both front and back of the wheel.
- Pay particular attention to the inner barrel and behind the spokes, where brake dust builds up thickest and is easiest to miss.
- Rinse thoroughly and let the wheel dry completely — any trapped moisture in vent holes or behind the barrel will cause adhesion problems later.
- Finish with a wipe-down using isopropyl alcohol on a clean cloth to remove any last oily residue before sanding.
Step 3: Address Existing Damage and Old Finish
- Curb rash and chips: fill deep gouges with a wheel-specific filler, then sand smooth once cured — painting directly over deep curb damage will telegraph through the new finish.
- Rust on steel wheels: treat with a rust converter or remove with a wire wheel before priming; painting over active rust guarantees early failure.
- Existing clear coat or paint: scuff-sand the entire wheel with 320–400 grit to give the new primer something to grip, focusing extra attention on glossy factory clear coat, which is otherwise too smooth for paint to bond to.
- Chrome wheels: require more aggressive prep than painted wheels, since chrome is one of the hardest surfaces for paint to adhere to — a dedicated adhesion promoter for chrome, applied after thorough sanding, is close to mandatory rather than optional here.
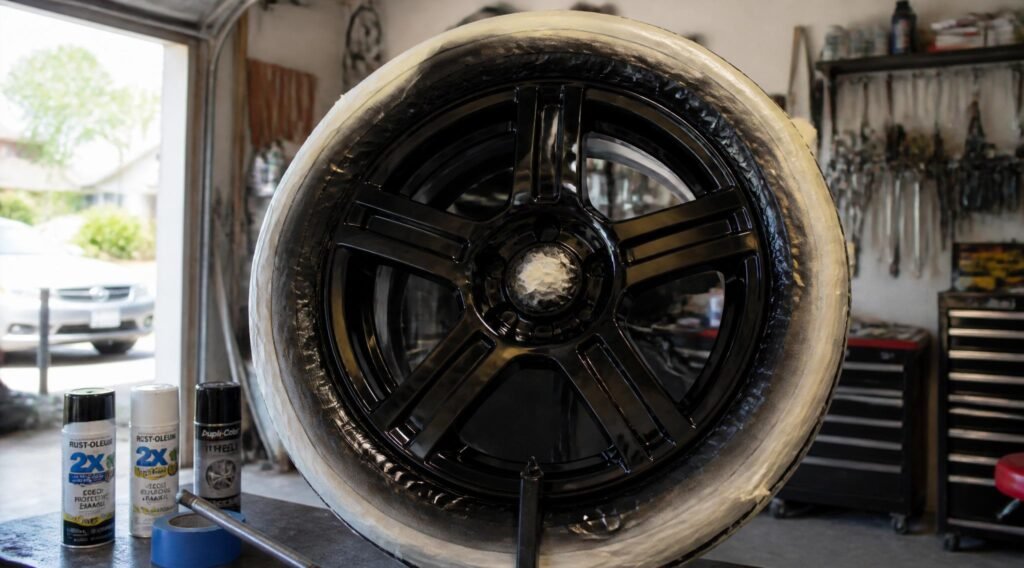
Step 4: Mask What Should Never Be Painted
- Tires: use dedicated wheel-masking cards or heavy cardboard cut to fit inside the tire bead, taped in place, rather than trying to tape the tire itself.
- The mounting hub surface and lug nut seating areas: mask these completely with tape, as covered in the safety note above.
- Valve stems: cover or remove before spraying and reinstall after the wheel is fully cured.
- Any TPMS (tire pressure sensor) hardware visible inside the wheel: mask carefully, since overspray on sensor components can occasionally interfere with function.
Step 5: Prime for Your Wheel Material
As with any metal project, primer selection depends on what the wheel is actually made of — our metal spray painting guide covers this in more depth, but the wheel-specific version is straightforward: steel wheels need a rust-inhibiting primer, aluminum alloy wheels (the most common type on modern cars) need a self-etching primer since aluminum’s natural oxide layer resists standard primers, and chrome wheels need a bonding primer specifically formulated for chrome or other slick, non-porous metal finishes.
Apply primer in thin, even coats, working into spoke gaps and lug holes where primer tends to build up unevenly. Let it cure fully before moving to color — this step matters more on wheels than almost any other project, since heat cycling from braking will expose weak adhesion faster than ambient weather alone.
Step 6: Choose the Right Paint
| Paint Type | Best For | Heat/Durability Notes |
| Standard wheel-specific spray paint | Daily drivers, budget refresh | Formulated for brake heat and road exposure better than general enamel |
| High-heat automotive enamel | Wheels on vehicles with aggressive braking (towing, performance use) | Rated for sustained higher temperatures near brake components |
| 2K (two-component) rim paint kits | Enthusiasts wanting the most durable DIY option | Chemically hardens rather than just air-drying; often needs no separate clear coat |
| Plasti Dip / rubberized coating | Temporary color changes, low commitment | Peelable and reversible, but far less durable long-term than true paint |
For most daily-driven vehicles, a wheel-specific enamel with a hard clear coat on top offers the best balance of cost, durability, and ease of application without needing specialized two-component equipment.
Step 7: Apply Color in Thin, Even Coats
Wheel geometry — spokes, curves, recessed lug areas — makes even coverage trickier than a flat panel, and it’s exactly the kind of project where the fundamentals in our spray painting tips guide pay off the most.
- Spray from multiple angles to get full coverage into spoke gaps and behind lug holes — a single straight-on pass leaves shadowed, uncoated areas in recessed sections.
- Hold the can 6–8 inches from the surface for wheels specifically — slightly closer than flat-panel work, since wheels have more complex geometry that benefits from more controlled, targeted coverage.
- Apply 3–4 thin coats rather than 1–2 heavy ones, letting each flash off per the label before the next.
- Rotate the wheel between coats so you’re always spraying at a comfortable angle rather than reaching awkwardly to cover the far side.
Curing Time: Don’t Rush This One
Touch-dry happens within an hour or two, but full cure for wheel-rated enamel paints typically takes a full 24–48 hours minimum, and manufacturers of dedicated wheel paint often recommend waiting a full week before regular highway driving to allow maximum hardness against heat cycling from braking.
Reinstalling and driving on wheels before the paint has genuinely hardened is the single most common reason a wheel repaint fails early — brake heat during the first few hard stops can soften under-cured paint in ways that show up as cracking or peeling near the hub area within weeks.
Step 8: Seal With a Heat-Resistant Clear Coat
A clear coat matters enormously on wheels, arguably more than on any other project covered on this site, given the combination of UV exposure, brake dust, road salt, and heat cycling wheels face. Our clear coat guide covers finish options in general, but for wheels specifically, look for a clear coat labeled heat-resistant or automotive-grade rather than a general craft clear coat, which isn’t built for the temperatures wheels experience near the brakes.
Apply at least two coats of clear for meaningful protection, with extra attention to the outer face and lip of the wheel, which takes the most direct road debris and curb impact.
Comparing DIY Spray Paint to Powder Coating
Powder coating remains the more durable option overall — it’s electrostatically applied and cured at high heat, creating a thicker, harder finish than any aerosol product can match. It typically costs more and requires sending your wheels to a specialty shop rather than working in your own garage.
A well-executed DIY spray paint job with proper prep, wheel-rated paint, and a heat-resistant clear coat closes much of that durability gap for a fraction of the cost and without giving up your wheels for a week or more to a shop’s schedule. For daily drivers in moderate climates, spray paint is a genuinely reasonable choice; for track cars, aggressive towing use, or extreme climates with heavy road salt, powder coating’s extra durability margin is worth the added cost over the long run.
Choosing a Color and Finish
Gloss black and satin gunmetal remain the two most popular wheel finishes through 2026, favored for how well they hide brake dust buildup between washes compared to lighter colors like silver or white, which show grime far more visibly. Matte and satin finishes have also grown in popularity, giving a more modern, understated look than traditional gloss.
Two-tone wheels — a different color on the face versus the barrel, or painted spokes with a contrasting lip — require careful masking between sections and are best attempted only after you’ve got one full single-color wheel job under your belt. If this is your first wheel project, a single solid color across the whole wheel is the more forgiving and still very effective choice.
Budgeting Time and Cost for a Full Set
A full set of four wheels realistically takes a full weekend once you account for cleaning, prep, multiple coats with drying time between them, and cure time before reinstalling. Rushing a multi-wheel project to finish in a single day is one of the most common ways corners get cut on prep or cure time.
Materials for a set of four typically run $60–$150 depending on paint quality and whether you use a two-component kit — degreaser, sandpaper in a couple of grits, primer, 3–4 cans of color, clear coat, and masking supplies for the tires and hub areas. Compared to professional refinishing or powder coating, which commonly runs several hundred dollars for a set of four, the DIY route offers meaningful savings for anyone willing to put in the prep time.
Troubleshooting Common Wheel Paint Problems
Bubbling near the lug holes or barrel usually means trapped moisture or brake dust residue that wasn’t fully cleaned before priming — our guide on why spray paint bubbles covers the fix, which means sanding back the affected section and starting over with a properly degreased and dried surface.
Drips pooling in spoke gaps and around lug holes are the most common cosmetic issue on wheel projects, since these recessed areas collect extra paint on every pass. Our guide to fixing spray paint drips and runs covers the sand-and-recoat process for cleaning these areas up before your final clear coat.
Early chipping near the outer lip almost always traces back to skipped cure time or an under-rated clear coat rather than a flaw in the color coat itself — if this happens repeatedly, the fix is usually a heat-resistant clear coat and stricter cure-time discipline rather than switching color brands.
Should You Use a Spray Gun Instead of Aerosol Cans?
For a full set of four wheels, some DIYers step up to an HVLP spray gun for more control and material efficiency across multiple wheels. Our guide to spray gun types covers the tradeoffs — a gun gives finer control over coat thickness across a full set and can be more cost-effective than aerosol cans at that volume, at the cost of needing compatible thinned paint and a proper cleanup routine between wheels.
Plastic Hubcaps and Trim Rings
If your vehicle uses plastic hubcaps or has plastic trim rings rather than true alloy wheels, prep is different from metal. Our plastic spray painting guide covers the adhesion promoter and prep steps plastic needs, since metal wheel primers don’t bond to plastic the same way.
Quick-Reference Checklist
- Remove wheels and support the vehicle safely on jack stands
- Deep clean and degrease every surface, front, back, and inner barrel
- Repair curb damage, rust, or old chipped paint before priming
- Mask tires, mounting hub surfaces, lug seats, and valve stems completely
- Prime with the correct type for your wheel material (steel, aluminum, chrome)
- Apply 3–4 thin color coats, spraying from multiple angles for full spoke coverage
- Allow full cure time — 24–48 hours minimum, up to a week before regular driving
- Seal with a heat-resistant, automotive-grade clear coat, two coats minimum
- Never coat the hub mounting surface or lug nut seating areas
Seasonal and Climate Considerations
Wheels in regions with heavy winter road salt face a much tougher durability test than wheels in dry, mild climates. Salt accelerates corrosion on steel wheels and can work into any gap in the clear coat over a season of exposure, so an extra coat of clear sealant and more frequent washing during winter months meaningfully extends the life of a fresh paint job in salt-heavy regions.
In hot climates, prioritize a genuinely heat-resistant clear coat over a standard one, since ambient temperatures combined with brake heat push wheels into a higher sustained temperature range than in cooler regions. If you live somewhere with both harsh winters and hot summers, treat the heat-resistant clear coat as non-negotiable rather than a nice-to-have upgrade.
Frequently Asked Questions
Can you spray paint wheels without removing them from the car?
It’s possible but not recommended. Removal gives full access for cleaning, priming, and coating every surface evenly, and avoids overspray risk on your car’s paint, brakes, and tires. Professional-looking results are much harder to achieve with wheels still mounted.
How long does spray paint last on wheels?
With proper prep, wheel-rated paint, and a heat-resistant clear coat, a DIY wheel repaint can reasonably last 2–4 years of daily driving, sometimes longer in mild climates with light road salt exposure. Aggressive driving, heavy braking, and harsh winters will shorten that timeline.
Do I need special heat-resistant paint for wheels?
Yes, or at minimum a wheel-specific or automotive-grade product rather than general-purpose spray paint. Wheels experience real heat cycling from brake use that general craft or hobby spray paints aren’t formulated to withstand long-term.
Is Plasti Dip a good option for painting wheels?
It’s a reasonable choice if you want an easily reversible color change rather than permanent durability — it peels off cleanly later, which true paint doesn’t. For long-term durability, a proper primer, wheel-rated paint, and heat-resistant clear coat will outlast Plasti Dip significantly.
What happens if paint gets on the wheel’s mounting surface?
It can affect how tightly and evenly the wheel seats against the hub, potentially affecting lug nut torque retention over time. Mask these surfaces completely before painting, and if paint does get on them, sand it back off before reinstalling the wheel.
Can I paint over factory clear coat without removing it?
You can if the factory clear coat is fully intact and you scuff-sand it thoroughly to give the new primer something to grip. If the factory clear coat is peeling, chipped, or cloudy, remove it fully in the affected areas first, since new paint won’t reliably bond over a failing clear coat.
How do I know if my wheels are steel, aluminum, or chrome?
Aluminum alloy wheels are lighter and typically have a slightly duller, machined appearance compared to chrome’s mirror-like shine. Steel wheels are heavier and usually plainer in design, often covered by a hubcap or wheel cover. If you’re unsure, a quick magnet test helps — steel wheels are magnetic, aluminum alloy wheels are not.
Final Thoughts
Wheels are one of the most visually rewarding spray paint projects on this site — a full set transforms a car’s look more than almost any other single upgrade — but they’re also one of the least tolerant of shortcuts, given the safety and heat considerations involved. Deep clean, prep for your specific wheel material, mask what shouldn’t be painted, apply thin coats, respect cure time, and finish with a real heat-resistant clear coat.
If you’re tackling a full vehicle refresh rather than just the wheels, our bike frame painting guide covers a similar structural, high-wear project if you’re also refinishing a bike alongside your car, and the same underlying prep-and-patience principles carry across both — full disassembly, material-appropriate primer, thin coats, real cure time, and a durable clear coat that’s rated for the actual conditions the finished piece will face.