By Rodney Shiner | Troubleshooting & Fixes | Updated July 2026
Reading Time: ~12–14 minutes
Every spray painter ends up with paint somewhere it wasn’t supposed to go — a fine mist on your hands, an overspray drift onto the driveway, a splatter on the jeans you forgot to change out of. Spray paint’s biggest strength as a tool, the way it atomizes into a fine, far-reaching mist, is exactly what makes it so easy to get on things you never intended to paint.
The good news is that removal is almost always possible if you catch it before the paint fully cures, and even fully cured paint can usually be removed from most surfaces with the right approach. The method that works, though, depends entirely on what the paint landed on — a technique that safely lifts paint off skin will damage glass, and a solvent that works on concrete will ruin fabric. There’s no single universal paint remover, no matter what a bottle on a store shelf might claim.
This guide walks through removal methods surface by surface, plus how to tell fresh paint from cured paint and when you’re better off simply working with the paint rather than fighting it. For prevention rather than cleanup, our spray painting tips guide covers technique and overspray control that heads off most of these problems before they start.
Fresh Paint vs. Cured Paint: Why It Actually Matters
The single biggest factor in how easily spray paint comes off is how long it’s had to dry. Wet or freshly-touch-dry paint (within the first hour or so) is soft and hasn’t fully cross-linked yet, so it lifts away with much gentler methods — often just soap, water, or a bit of oil.
Fully cured paint (typically 24–72 hours after application, depending on the formula) has hardened into a durable film that bonds tightly to whatever it’s on. At that stage, removal usually requires solvents, mechanical abrasion, or both. If you notice an accidental spot of paint, deal with it immediately rather than waiting — the difference between a five-minute cleanup and a twenty-minute one is almost always how fast you caught it. Even a delay of a few hours can be the difference between soap and water working versus needing a dedicated solvent.
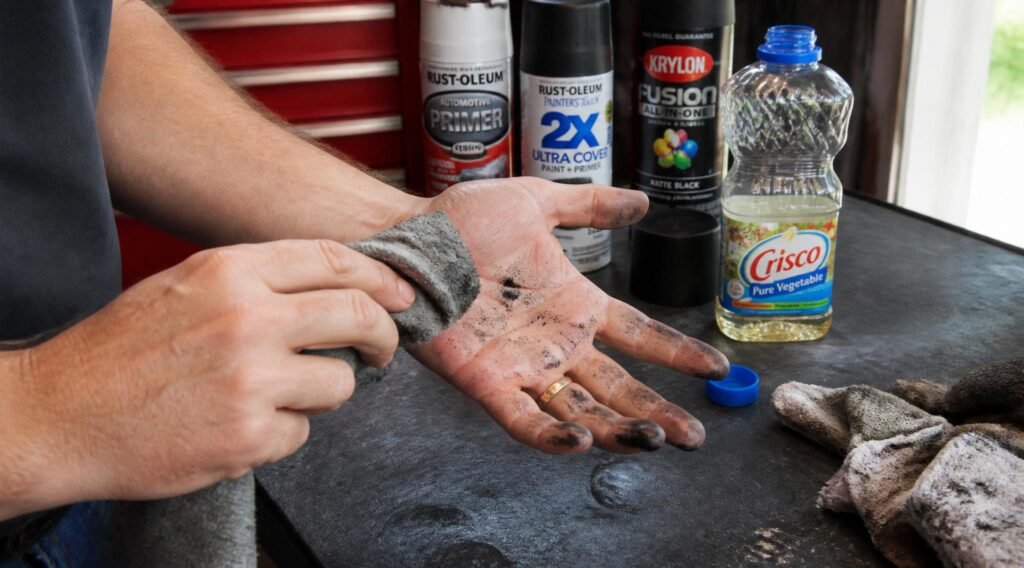
Removing Spray Paint From Skin
Skin is one of the easiest surfaces to clear, since you’re not trying to protect a finish underneath — you just need something gentle enough not to irritate skin while still breaking down the paint film.
- Start with warm water and a strong hand soap or dish soap, scrubbing gently with a soft nail brush — this alone removes a surprising amount of fresh paint.
- If soap alone doesn’t work, apply cooking oil, baby oil, or coconut oil to the area and gently rub it in — oil breaks down the paint’s bond to skin without the harshness of solvents.
- For stubborn spots, a small amount of petroleum jelly worked in with a cloth, left for a few minutes, then wiped away is a step up in strength while still being skin-safe.
- As a last resort for fully cured paint, a small amount of rubbing alcohol on a cotton pad can work, but test on a small area first and moisturize afterward, since it can dry out skin with repeated use.
- Avoid acetone, paint thinner, or lacquer thinner directly on skin — these are far more aggressive than necessary and can cause genuine irritation or chemical burns with extended contact.
Removing Spray Paint From Clothes and Fabric
Fabric removal success depends heavily on catching the paint while it’s still wet — cured spray paint on fabric is genuinely difficult to fully remove and sometimes impossible without damaging the fabric itself.
- Act immediately: scrape off any excess wet paint with a dull edge (a spoon or dull knife) before it spreads further into the fibers.
- Turn the garment inside out and rinse the back of the stain under cold running water — this pushes the paint out the way it went in rather than deeper into the weave. Never use hot water, which can set the stain permanently.
- Apply a small amount of rubbing alcohol or a dedicated fabric-safe paint remover directly to the stain, then dab (don’t rub) with a clean cloth, working from the outside of the stain inward to prevent spreading.
- Launder as normal once the visible paint is gone, checking the stain is fully out before putting the garment in the dryer — heat will set any remaining paint permanently.
- For cured paint on fabric you care about, consider this a long-shot repair rather than a guaranteed fix, and test any solvent on an inside seam first.
Removing Spray Paint From Concrete and Masonry
Concrete’s porous surface makes it excellent for accepting new spray paint intentionally, as covered in our concrete spray painting guide — but that same porosity means accidental overspray or old graffiti soaks in and holds on tenaciously.
- For fresh overspray, a pressure washer alone often lifts a surprising amount of paint before it’s had time to fully bond with the porous surface.
- For set-in paint, apply a dedicated graffiti remover or paint stripper formulated for masonry, following the product’s dwell time exactly — removing it too early wastes product, too late lets it dry back onto the surface.
- Scrub with a stiff-bristled brush (not wire, which can scratch decorative concrete) after the stripper has had time to work, then rinse thoroughly with a pressure washer or hose.
- For particularly stubborn or old paint, a second stripper application is usually more effective and less damaging to the concrete than resorting to aggressive mechanical grinding.
- Avoid straight acetone or paint thinner on decorative or colored concrete, since these can affect the concrete’s own color and sealant.
Removing Spray Paint From Metal
If you’re trying to remove paint to redo a project covered in our metal spray painting guide, the good news is metal tolerates aggressive removal methods better than almost any other surface.
- Chemical paint strippers formulated for metal are the most effective option for full removal, applied per label instructions and scraped away once the paint bubbles and lifts.
- For smaller areas or touch-up corrections, 120–220 grit sandpaper works well and doubles as surface prep if you’re planning to repaint.
- A heat gun can soften paint for scraping on metal (never on plastic, which will melt or warp), but keep it moving to avoid scorching the metal or triggering fumes from certain paint formulations.
- Always work in a ventilated area with gloves and eye protection when using chemical strippers — they’re significantly harsher than the paint they’re removing.
Removing Spray Paint From Plastic
Plastic requires the most caution of any surface, since many solvents that remove paint will also dissolve, cloud, or melt the plastic underneath. If you’re trying to redo a project from our plastic spray painting guide, start with the gentlest option and work up.
- Start with soapy water and a soft brush — surprisingly effective on paint that hasn’t fully cured.
- Isopropyl alcohol is generally safe on most plastics and removes moderate paint buildup without the aggression of stronger solvents.
- Avoid acetone on plastic entirely unless you’ve tested it on an inconspicuous spot first — it dissolves many common plastics, especially polystyrene and some ABS formulations, rather than just the paint.
- For textured or detailed plastic where scrubbing risks damage, a plastic-safe paint remover (check the label specifically) is worth the extra cost over a general-purpose stripper.
Removing Spray Paint From Glass and Ceramic
Glass and glazed ceramic are actually two of the more forgiving surfaces to strip, since the base material itself is essentially solvent-proof — you only need to worry about the paint film. If you’re correcting a project from our spray painting glass guide or our ceramic spray painting guide, a razor blade held at a low angle will lift most cured paint cleanly off a flat glass surface without scratching it.
- For curved glass or ceramic where a razor blade is impractical, acetone or a dedicated paint stripper on a cloth, left to sit for several minutes, softens the paint for wiping away.
- Isopropyl alcohol works for lighter paint or fresh overspray without needing anything stronger.
- Rinse and wash thoroughly after using any solvent, especially on items that will later hold food or drink.
Understanding Why Removal Methods Differ So Much
It’s worth understanding the underlying logic rather than just memorizing a chart, since real-world situations rarely match a guide exactly — the exact fabric blend, paint formula, or surface finish you’re dealing with won’t always be listed by name. Spray paint removal is really about breaking one of two bonds: the chemical bond between paint and surface, or the physical bond of a dried paint film holding together.
Oils and mild solvents work by softening the paint film itself, which is why they’re the safest starting point on delicate surfaces like skin and fabric — they weaken the paint without attacking what’s underneath. Stronger solvents like acetone or dedicated strippers work more aggressively, breaking the chemical bond between paint and surface, which is powerful but also more likely to affect the surface itself if it isn’t fully solvent-resistant. Mechanical methods — sanding, scraping, pressure washing — physically separate the paint film without any chemical reaction at all, which is why they’re often the safest choice for surfaces that don’t react well to solvents, like certain plastics or painted trim. Knowing which category a method falls into helps you predict roughly how it will behave on a surface you haven’t tried it on before, even without a specific product recommendation in hand.
Once you think about removal this way, choosing a method for an unusual situation gets much easier: ask whether the surface is solvent-sensitive (most plastics, some paints, some fabrics) or physically delicate (thin metal, soft stone, anything easily scratched), and let that steer you toward chemical or mechanical removal rather than guessing. This single question resolves the vast majority of “what do I use on this?” situations that don’t fit neatly into any chart.
A Note on Testing Before You Commit
Almost every removal method on this page carries the same caveat: test on a small, hidden area first. This isn’t just cautious boilerplate — it’s the single most reliable way to avoid turning a paint problem into a bigger, costlier surface-damage problem down the line.
For fabric, test on an inside seam or hem. For furniture or cabinetry, test on the underside or back panel. For flooring, test in a closet or under a rug’s edge. Give the test spot a few minutes to fully react before judging the result — some solvents take time to show whether they’re softening the surface underneath rather than just the paint. A spot that looks fine after thirty seconds can still show clouding, discoloration, or softening a few minutes later, so patience during the test step saves real disappointment on the full surface.
This same principle applies in reverse when you’re painting rather than removing — our tips for spray painting guide recommends testing spray distance and technique on scrap material before committing to the real project, for exactly the same reason.
Removing Spray Paint From Wood
- For fresh paint on unfinished or raw wood, act fast with a rag and mineral spirits before it soaks into the grain — wood’s porosity means paint bonds quickly and deeply once it sets.
- For cured paint, a chemical wood-safe stripper followed by light sanding is the most reliable full-removal method, since wood grain traps paint in ways that solvents alone often can’t fully clear.
- On finished or sealed wood (varnished furniture, sealed floors), start with the gentlest solvent that will touch the paint without also attacking the finish underneath — isopropyl alcohol is a safer first step than acetone or lacquer thinner on any sealed surface.
- Heavily grained or textured wood may need a stiff-bristled brush worked into the grain after the stripper has had time to soften the paint, since a flat scraper alone can miss paint trapped in the texture.
Removing Overspray From Cars, Windows, and Nearby Surfaces
- On car paint and clear coat: never use gasoline or an abrasive rubbing compound as a first step. Start with a dedicated bug-and-tar remover or a small amount of cooking oil on a soft cloth, and only escalate to a rubbing/cutting compound if gentler methods fail.
- On windows and glass surfaces near a project: a razor blade at a low angle, as with painted glass, works cleanly on flat panes.
- On surrounding walls, trim, or flooring that caught overspray: act fast with mineral spirits or isopropyl alcohol on a cloth for latex or acrylic overspray before it fully sets, testing an inconspicuous spot first.
- The best fix for overspray is always prevention — drop cloths, painter’s tape, and choosing a calm day for outdoor projects save far more time than any removal method.
When to Stop Trying to Remove It — and Repaint Instead
Sometimes the paint has been on long enough, or the surface is delicate enough, that removal risks doing more damage than the paint itself. In those cases, painting over the mistake is often the better call. Our guide on painting over existing spray paint covers how to prep and blend a new coat over an old one so the fix looks intentional rather than patched.
This is also the right call if a removal attempt leaves behind drips, uneven patches, or a rough texture — our guide to fixing spray paint drips and runs covers cleaning up those specific issues before you repaint over them.
Quick-Reference Removal Chart
| Surface | First Try | If That Fails |
| Skin | Soap and warm water | Cooking oil, then rubbing alcohol |
| Clothes/fabric | Cold water rinse (inside-out) | Rubbing alcohol, dab and blot |
| Concrete/masonry | Pressure washer | Masonry-safe paint stripper + scrub brush |
| Metal | Sandpaper (120–220 grit) | Chemical stripper or heat gun |
| Plastic | Soapy water | Isopropyl alcohol (test first) |
| Glass/ceramic | Razor blade at low angle | Acetone or paint stripper on a cloth |
| Car paint/clear coat | Cooking oil or bug remover | Rubbing compound (last resort) |
Safety Notes for Paint Removal
Removal solvents are often stronger-smelling and more concentrated than the paint itself, and deserve the same respect. Work in a ventilated space, wear gloves when handling strippers or solvents, and avoid mixing chemical removers with other household cleaners. Our complete spray paint safety guide covers respirator selection and ventilation setup that applies just as much to removal as it does to the original painting.
- Never combine ammonia-based cleaners with bleach-based paint removal products — this creates toxic fumes.
- Dispose of solvent-soaked rags outdoors, spread flat until fully dry, before throwing them away — bunched, solvent-soaked rags are a genuine fire risk.
- Keep children and pets away from any area being treated with paint stripper or solvent until it’s fully rinsed and dry.
Frequently Asked Questions
Does WD-40 remove spray paint?
It can help loosen fresh, uncured overspray on hard surfaces like metal or glass, working similarly to an oil-based remover, but it’s not strong enough for fully cured paint or for use on skin and fabric.
Will nail polish remover take off spray paint?
Acetone-based nail polish remover can work on glass, metal, and some cured paint, but test it first on plastic and fabric, since acetone can damage or dissolve many plastics and set certain fabric dyes.
How do you remove spray paint without damaging the surface underneath?
Always start with the gentlest method for that specific surface — soap and water, then oil, then isopropyl alcohol — before reaching for stronger solvents or abrasives, and test any new product on a small hidden area first.
Can you remove spray paint from a car without repainting?
Yes, if the overspray hasn’t bonded with or damaged the clear coat underneath. Oil-based removers and rubbing compounds typically handle this without needing a repaint, but deep or long-set overspray may require professional detailing.
How long does spray paint take to fully cure before it’s hard to remove?
Most spray paints are touch-dry within an hour but don’t reach full cure for 24 to 72 hours. Treat anything within that window as still removable with gentler methods, and anything beyond it as requiring solvents or abrasion.
Is it safe to use a heat gun to remove spray paint indoors?
Only with good ventilation running. Heating paint releases fumes regardless of the paint type, and enclosed indoor use without airflow concentrates those fumes quickly. Open a window or work outdoors when possible.
Does rubbing compound damage clear coat when removing overspray from a car?
Used correctly and sparingly, no — rubbing compound is mild enough for occasional spot use on most factory clear coats. Repeated heavy use over the same area can thin the clear coat over time, which is why it’s positioned as a later step rather than a first try.
Final Thoughts
Spray paint accidents are inevitable — even careful, experienced painters end up with a stray mark somewhere eventually. The key is matching the removal method to the surface and acting while the paint is still fresh whenever possible, since every surface on this list gets meaningfully harder to clean the longer the paint sits.
Keep a small removal kit on hand for your next project — dish soap, cooking oil, isopropyl alcohol, and a few clean rags cover the majority of accidental spray paint situations without needing anything more aggressive. The rest of this guide is here for the situations that need more than that.
And if a mistake turns out to be unfixable without risking the surface underneath, that’s not a failure — it’s a normal part of working with a fast, versatile, occasionally messy tool. Sand it, prime it, and repaint over it, and most of the time the fixed version looks better than the original ever did. Every experienced spray painter has a story like this somewhere in their history.