The Complete Spray Paint Safety Guide: Protecting Yourself From Fumes, VOCs, and Hazards (2026)
By Rodney Shiner | Safety & Regulations | Updated June 2026
Every spray paint project starts the same way — you shake the can, hear that satisfying rattle, and get excited about the transformation ahead. What most people don’t think about until it’s too late is what’s actually leaving that nozzle along with the color: solvents, propellants, and fine airborne particulates that your lungs, eyes, and skin were never designed to handle in concentrated form.
This isn’t about scaring you away from spray painting. It’s one of the fastest, most satisfying ways to refinish almost anything, from a rusty patio table to a set of kitchen cabinets. But the difference between a project that leaves you with a beautiful finish and one that leaves you with a headache, a rash, or worse, almost always comes down to a handful of safety habits that take minutes to put in place.
This guide covers exactly what’s in the can, the real health risks of skipping protection, the gear that actually matters versus the gear that’s optional, how to set up ventilation properly whether you’re working in a garage or outdoors, fire and storage hazards most people never think about, and project-specific safety notes for the surfaces covered elsewhere on this site.
Why Spray Paint Safety Isn’t Optional
Brush painting and spray painting expose you to very different levels of risk. When you brush paint, the coating stays where you put it. When you spray paint, a meaningful percentage of every pass becomes airborne — a fine mist of solvent and pigment that drifts well past the surface you’re aiming at. Indoors, that mist has nowhere to go except into the air you’re breathing and onto every surface in the room.
The aerosol format adds a second layer of risk that brush-on paint doesn’t have: the propellant. That’s the gas that pushes the paint out of the can, and it’s almost always flammable. Combine airborne solvent vapor with a flammable propellant in an enclosed space and you’ve created conditions where a water heater pilot light or a garage door opener’s spark can become a genuine hazard, not just a theoretical one.
None of this means spray paint is dangerous when used correctly. Millions of DIY projects get finished safely every year. It means the standard advice — mask, gloves, ventilation — deserves more explanation than it usually gets, because knowing why each step matters is what actually gets people to follow through on it.
Understanding What’s Actually in the Can
Every aerosol spray paint is built from four basic components, and each one carries its own safety consideration.
- Solvents (VOCs) — Volatile organic compounds are what keep the paint liquid in the can and allow it to level out smoothly after it lands. They evaporate quickly, which is exactly what puts them into the air you breathe. Common ones include toluene, xylene, and acetone, depending on the formulation.
- Propellant — Usually a blend of butane, propane, or dimethyl ether under pressure. This is the flammable component and the reason cans carry fire warnings.
- Resins and binders — The film-forming ingredients that hold pigment to the surface once the solvent evaporates. Generally low-risk once cured, but part of the wet mist during application.
- Pigments and additives — Color, UV stabilizers, anti-settling agents. Mostly low-volatility, but still part of the fine particulate you can inhale if unprotected.
The single best habit you can build here costs nothing: read the Safety Data Sheet (SDS) for the specific product you’re using before you start. Every reputable manufacturer publishes one, and it lists the exact hazard class, recommended PPE, and first-aid measures for that formulation — because “spray paint” covers everything from low-VOC water-based formulas to solvent-heavy enamels with very different risk profiles.
The Real Health Risks of Unsafe Spray Painting
Short-term overexposure — spraying in a closed room with the door shut, for example — typically shows up fast: headache, dizziness, nausea, a metallic taste, throat irritation, or eye watering. These symptoms are your body’s way of telling you the air is contaminated, and they usually resolve once you get to fresh air. Treat them as a hard stop signal, not something to push through.
Repeated exposure over time is the bigger concern for anyone who paints frequently — hobbyists refinishing furniture every weekend, or anyone running a small refinishing side business. Chronic solvent exposure has been linked to respiratory irritation, headaches, and in some formulations, more serious long-term effects with heavy, unprotected use. This is exactly why professional auto body and furniture refinishing shops invest in dedicated spray booths and supplied-air respirators rather than treating protection as optional.
Skin contact is the most commonly overlooked risk. Overspray lands on bare arms and hands constantly, and solvents in the paint can cause dryness, irritation, or dermatitis with repeated unprotected contact — even though it rarely feels dangerous in the moment.
Certain groups face elevated risk and should take extra precautions or avoid unprotected exposure entirely: people with asthma or existing respiratory conditions, pregnant individuals, and anyone with known chemical sensitivities. If any of these apply to you, favor outdoor spraying, low-VOC formulas, and a properly rated respirator every time, not just for larger projects.
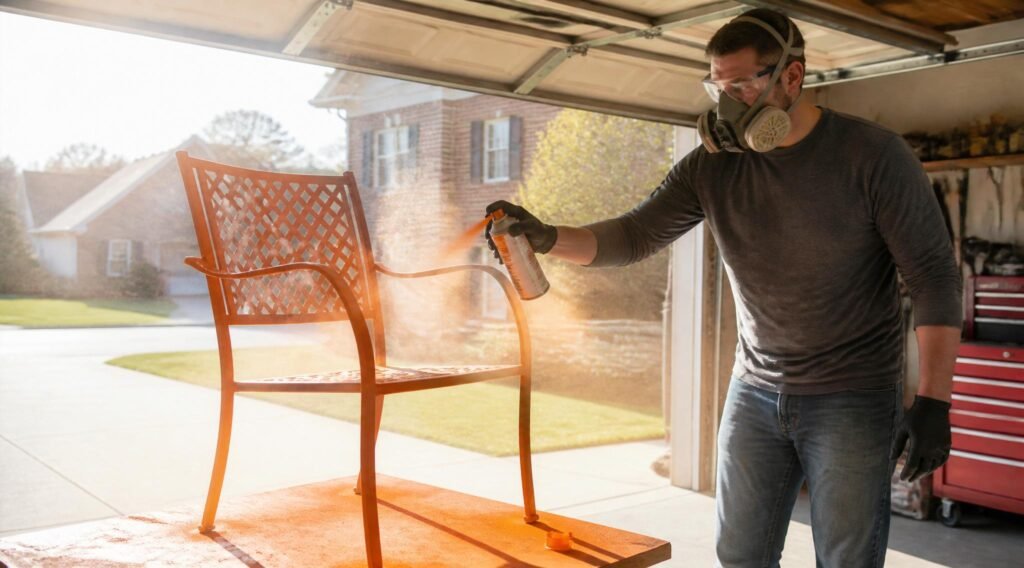
Personal Protective Equipment: What You Actually Need
Not every project needs the same level of protection. A ten-minute touch-up on a small metal bracket outdoors is a different risk profile than a full afternoon refinishing a set of kitchen cabinets in an attached garage. Here’s how to match your gear to the job.
Respiratory Protection
This is the piece of equipment people get wrong most often — usually by wearing a basic dust mask and assuming it’s doing the job. Paper and cloth dust masks filter particulates, not solvent vapor. They do essentially nothing against VOCs, which are the primary respiratory hazard in spray paint.
Eye Protection
Standard glasses aren’t a substitute for sealed safety goggles. Overspray drifts on air currents you won’t feel, and solvent vapor can irritate eyes even without direct contact. Vented goggles rated for chemical splash are inexpensive and worth keeping in the same kit as your respirator.
Skin and Hand Protection
Nitrile gloves are the standard choice — they resist most paint solvents better than latex and won’t degrade as quickly. Long sleeves and, ideally, disposable coveralls limit skin exposure during longer sessions, especially anything involving primers, adhesion promoters, or rust converters, which tend to carry stronger solvent loads than standard color coats.
Respirator Comparison: Choosing the Right Level of Protection
Use this as a quick reference for matching respirator type to project scale. When in doubt, size up — undersized protection is the single most common mistake in home spray painting.
| Respirator Type | Protects Against | Best For | Approx. Cost |
| Paper/dust mask (N95) | Particulates only — no VOC protection | Sanding, dry prep work only — not spraying | $1–3 |
| Half-face, organic vapor cartridge | VOCs, solvent vapor, and particulates | Most DIY spray paint projects, garage or outdoor | $20–45 |
| Full-face, organic vapor cartridge | Same as half-face, plus full eye/face seal | Extended sessions, stronger solvents, enclosed spaces | $60–120 |
| Supplied-air / PAPR | Continuous filtered or external air supply | Professional refinishing, daily/heavy use | $300+ |
Setting Up Safe Ventilation
Outdoors is always the safest default when it’s an option — wind and open air disperse solvent vapor far faster than any indoor setup can. Pick a calm day, position yourself upwind of your project, and keep a drop cloth down to control overspray drift.
When outdoor spraying isn’t practical — winter projects, larger cabinet or furniture jobs, or anything that needs a controlled environment — a garage or workshop can work, but it needs real cross-ventilation, not just a door propped open. Set up one fan pulling air out through a window or garage door opening, positioned behind or beside you so it pulls overspray and vapor away from your breathing zone rather than blowing it back at you. A second opening on the opposite side of the space creates the airflow path that actually clears the air instead of just recirculating it.
If you’re spraying indoors regularly — for cabinets, furniture flips, or craft projects — a simple DIY spray booth (a cardboard or plastic sheeting enclosure with a fan pulling air through a filter to the outside) dramatically cuts down on both overspray mess and airborne exposure. It’s worth the twenty minutes of setup for anything beyond a quick touch-up.
Your equipment choice also affects ventilation needs. If you’re working with a spray gun instead of an aerosol can, note that HVLP (High Volume, Low Pressure) systems produce significantly less overspray than conventional or airless setups, which meaningfully reduces the amount of airborne solvent and particulate in your workspace — one more reason HVLP is often the better indoor choice for detail and furniture work.
Fire and Explosion Hazards
The propellant inside every aerosol can is flammable, and this is the risk category people underestimate most. A few rules that matter every time you spray:
- Never spray near open flames, pilot lights (water heaters and furnaces are common culprits in garages), running motors, or anything that sparks.
- Don’t smoke, and keep anyone else who might, well away from your work area while spraying and for several minutes after.
- Store cans below 120°F and away from direct sunlight — heat buildup inside a hot car or shed can pressurize a can to the point of rupture.
- Never puncture, incinerate, or crush an aerosol can, even an empty-feeling one — there’s almost always residual propellant left inside.
- Keep a fire extinguisher rated for flammable liquids within reach any time you’re spraying in an enclosed space.
Project-Specific Safety Considerations
Safety needs shift slightly depending on what you’re painting and what prep products you’re using alongside the paint itself.
Metal Projects
Metal work often involves the strongest-smelling products on the shelf — rust-inhibiting primers, high-heat formulas, and DTM (direct-to-metal) paints tend to carry heavier solvent loads than general-purpose color coats. If you’re working through a full metal painting project from bare rust to finished coat, plan for extended ventilation time, not just during spraying but through the primer flash-off period as well. The same applies whether you’re refinishing stainless steel or troubleshooting issues like bubbling on a metal surface — reworking a botched section means a second round of solvent exposure, so it’s worth getting ventilation and technique right the first time. If you’d rather sidestep aerosol solvents altogether for a small piece, painting metal by brush is a lower-exposure alternative worth considering for detail work.
Plastic Projects
Plastic prep products, especially adhesion promoters, are typically fast-drying, high-VOC formulations by design — that’s part of how they bond to notoriously paint-resistant plastics like polypropylene. Because these products flash off quickly, vapor concentration can spike fast in an enclosed space, so treat adhesion promoter application with the same respirator and ventilation standards as your heaviest-duty metal primers, even though the can looks similar to a standard color coat.
Spray Foam and Insulation Surfaces
Foam substrates are porous and can trap overspray and off-gassing longer than solid surfaces. When painting spray foam insulation, extend your ventilation window well past the point where the surface feels dry to the touch, and choose a low-VOC or water-based acrylic formula where possible — it’s gentler on both the foam and your air quality.
Indoor Art and Craft Projects
Canvas and craft spraying often happens at a kitchen table or in a bedroom studio, which is exactly the kind of small, enclosed space where solvent buildup happens fastest. If you’re working on acrylic spray techniques for canvas art, favor water-based, low-odor formulas indoors and still crack a window or run a fan — “low odor” describes smell, not solvent content, and shouldn’t be read as “no ventilation needed.”
General Technique Habits That Improve Safety
Good spraying technique isn’t just about finish quality — it directly reduces your exposure. The core habits covered in our general spray painting tips guide — maintaining 8 to 12 inches of distance, keeping the can moving in smooth passes, and applying thin coats instead of one heavy pass — all reduce the volume of airborne overspray you generate per project. Heavy, close-range spraying doesn’t just cause drips and bubbling, it also puts more solvent into the air around you than a controlled, multi-thin-coat approach does.
Weather and Temperature: An Overlooked Safety Factor
Most safety advice focuses on PPE and ventilation, but the weather conditions you paint in affect both finish quality and your exposure risk. Hot, still days trap vapor close to the surface instead of letting it disperse, which means you’re breathing a more concentrated cloud even outdoors. Cold days slow solvent evaporation, which can extend the window where wet, unstable paint film off-gasses near your work area.
The sweet spot for most spray paints is roughly 50°F to 85°F with moderate humidity and a light breeze — conditions that happen to be ideal for finish quality too, which is a useful reminder that safety and good results usually point in the same direction rather than competing with each other. If you’re forced to work outside that range, extend your PPE use and ventilation time rather than skipping them because “it’s outdoors anyway.”
Wind deserves its own note: a light breeze helps disperse vapor, but a strong or gusty wind blows overspray back onto you, onto your project in uneven patterns, and onto anything nearby you didn’t intend to coat. Aim for calm-to-light airflow, and if you can, position yourself so the breeze carries overspray away from your body rather than across it.
Protecting the Space Around You: Kids, Pets, and Bystanders
Children and pets are more vulnerable to VOC exposure than adults, both because of smaller body mass and because they’re less likely to recognize or report symptoms like a headache or dizziness. Keep kids and animals out of the work area and, ideally, out of the building entirely while spraying and for at least 30 to 60 minutes afterward while the space clears.
If you’re spraying in a shared space like an apartment garage or a driveway near neighbors, a heads-up before you start is a small courtesy that avoids uninvited exposure for people who didn’t sign up for it.
Cleanup, Storage, and Disposal
A few end-of-project habits round out a safe spray painting routine:
- Let overspray-covered drop cloths and cardboard fully off-gas outdoors before folding and storing them — trapped solvent vapor in a rolled-up tarp is a fire and inhalation risk you can avoid for free.
- Store partially used cans upright, capped, away from heat sources, and out of reach of children.
- Never pour leftover liquid paint or empty aerosol residue down a drain — check your local municipality’s hazardous waste guidelines, since aerosol cans and solvent-based paints are regulated disposal items in most areas.
- Wash exposed skin with soap and water promptly after a session rather than waiting until you’re fully done for the day.
Recognizing Overexposure: When to Stop
Know these signs and treat any of them as a reason to leave the area immediately, not to push through and finish the section you’re on:
- Headache, dizziness, or lightheadedness
- Nausea or a metallic taste in your mouth
- Burning or watering eyes
- Throat or chest irritation, coughing
- Skin redness, itching, or rash on exposed areas
Fresh air resolves most mild symptoms within minutes. If symptoms are severe or don’t improve after moving to fresh air, seek medical attention and bring the product’s SDS or the can itself so responders know exactly what you were exposed to.
Quick-Reference Safety Checklist
- Read the SDS for your specific product before starting
- Choose outdoor spraying whenever the project allows it
- Set up real cross-ventilation if working indoors
- Wear an organic vapor cartridge respirator, not just a dust mask
- Wear sealed goggles and nitrile gloves
- Keep all ignition sources — pilot lights, motors, sparks, cigarettes — well away
- Store cans below 120°F, away from sunlight
- Keep children and pets out of the area during and after spraying
- Let rags and drop cloths off-gas outdoors before storing
- Dispose of cans and leftover product per local hazardous waste rules
Frequently Asked Questions
Is spray paint safe to use indoors at all?
Yes, with real cross-ventilation and the right respirator — a half-face organic vapor cartridge respirator at minimum. Low-VOC and water-based formulas reduce risk further, but ventilation still matters even with those.
Do I really need a cartridge respirator, or is a basic mask enough?
A basic dust or surgical mask filters particulates only. It does not filter solvent vapor, which is the primary hazard in spray paint. An organic vapor cartridge respirator is the minimum for actual spraying.
How long should I ventilate a room after spraying?
As a general guideline, keep ventilation running for at least 30 to 60 minutes after you finish spraying, longer for larger projects or stronger solvent-based products, and don’t let kids or pets back into the space until the smell has fully cleared.
Are low-VOC spray paints actually safer?
They reduce solvent content and typically lower both odor and health risk, but “low-VOC” isn’t “no-VOC.” Standard PPE and ventilation practices still apply.
What should I do if I start feeling dizzy while spraying?
Stop immediately, leave the area for fresh air, and don’t go back in until symptoms fully resolve. If symptoms are severe or persistent, seek medical attention.
Can I reuse a respirator cartridge, or does it need replacing often?
Organic vapor cartridges have a limited service life once exposed to air, and they lose effectiveness gradually rather than failing all at once — which is exactly why they’re easy to over-trust. As a general habit, replace cartridges if you notice any odor breaking through during use, and swap them out at least every few months with regular use, more often with heavy or daily spraying.
Final Thoughts
Spray paint safety isn’t complicated — it’s a short list of habits that take a few extra minutes per project: the right respirator, real ventilation, sensible fire precautions, and knowing when to stop and step outside. None of it slows down the fun part of the project, and all of it is the difference between a great-looking finish you enjoy and a project you regret the next morning.
Build these habits into your routine now, and they’ll carry over to every future project on this site — whether you’re tackling metal, plastic, foam, or your next furniture flip.