Metal is one of the most rewarding surfaces to spray paint — but also one of the most unforgiving. Done right, a spray-painted metal surface looks factory-finished and lasts for years. Done wrong, you get rust bleeding through paint, peeling within weeks, and a finish that looks worse than bare metal.
The difference comes down to two things: understanding what metal actually needs from a paint system, and doing the preparation that most people skip because it’s not the fun part.
This guide covers every metal type you’re likely to encounter — bare steel, galvanized metal, aluminum, cast iron, and previously painted metal — with specific prep and paint recommendations for each. Whether you’re painting outdoor furniture, a fence, a gate, a mailbox, automotive components, or indoor fixtures, this is your complete reference.
Why Metal Is Different From Other Surfaces
Before diving into technique, understanding metal’s unique challenges helps explain why certain steps are non-negotiable.
Metal doesn’t absorb paint. Unlike wood, which soaks up primer and paint into its grain, metal is non-porous. Paint bonds to metal purely through adhesion to the surface — which means any contamination, oxidation, or surface barrier breaks that bond completely.
Metal rusts. Steel and iron oxidize when exposed to moisture and oxygen. Rust is chemically active — it continues spreading under paint, lifting it from below. Painting over rust without treating it first guarantees the rust will continue growing and the paint will eventually bubble and peel.
Metal expands and contracts. Temperature changes cause metal to expand in heat and contract in cold. Paint that doesn’t flex with this movement — particularly rigid paints applied too thick — cracks and peels over time, especially on outdoor metal.
Different metals need different approaches. Galvanized steel, aluminum, and cast iron each have surface chemistry that affects how paint bonds to them. Using the wrong primer on galvanized metal, for example, is a common cause of adhesion failure that baffles DIYers who thought they did everything right.
Step 1: Identify Your Metal Type
Before buying any product, know what you’re painting. Different metals require different primers and sometimes different paint formulas.
| Metal Type | Common Uses | Primer Type Needed |
|---|---|---|
| Bare steel/iron | Fences, gates, railings, brackets | Rust-inhibiting metal primer |
| Galvanized steel | Gutters, HVAC ducts, outdoor furniture | Galvanized metal primer (special) |
| Aluminum | Window frames, gutters, auto trim | Self-etching primer or aluminum primer |
| Cast iron | Radiators, outdoor furniture, cookware | Rust-inhibiting primer + high-heat if needed |
| Stainless steel | Kitchen fixtures, outdoor items | Self-etching primer |
| Previously painted metal | Any repaint project | Bonding primer if glossy; metal primer if bare spots |
How to identify: Galvanized metal has a distinctive spangled or crystalline pattern on its surface. Aluminum is lightweight and does not rust (it oxidizes to a white powder instead). Steel is heavier and will show rust if the surface is scratched and left exposed. A magnet will stick to steel and cast iron but not to aluminum or stainless steel.
Step 2: Remove Rust — Completely and Thoroughly
Rust treatment is the step that separates lasting metal paint jobs from those that fail within a season. There is no legitimate shortcut here — painting over active rust always fails.
Assessing Rust Severity
Surface rust (light orange discoloration, no pitting): Sand with 80–120 grit sandpaper until the rust is gone and bare metal is visible. The surface will look bright and slightly scratched — this is correct. Follow with 220-grit to smooth, then clean thoroughly.
Moderate rust (pitting visible, loose flakes): Use a wire brush attachment on a drill or angle grinder to remove loose rust and flakes. Sand down to bare metal in the affected areas. A rust converter can be applied to any remaining rust that’s too deep to sand completely — it chemically converts rust to a stable compound that paint can bond to.
Heavy rust (deep pitting, structural compromise): Heavy rust often means the metal itself is compromised. Structural repairs may be needed before painting. For decorative pieces, this level of rust typically requires a complete rust removal process — chemical rust remover, wire brushing, or blasting — before painting is worthwhile.
Rust Converter: When to Use It
Rust converters (Corroseal, Permatex, Rust-Oleum Rust Reformer) chemically react with iron oxide to form a stable black compound that paint can adhere to. Use them when:
- Rust is in areas too tight or textured to sand completely
- The metal has surface pitting that still shows some rust after sanding
- You want an additional layer of rust protection under primer
How to apply: Clean the surface, apply rust converter per product instructions (usually brush-on), allow to dry fully (12–24 hours), then prime and paint as normal. Do not sand after applying rust converter — you’d remove the stabilized layer.
Step 3: Clean the Surface
Even after rust removal and sanding, metal surfaces contain oils from handling, manufacturing residues, sanding dust, and other contamination that will prevent paint from bonding properly.
Cleaning process:
- Wipe the entire surface with a lint-free cloth dampened with acetone or mineral spirits to remove oils, grease, and residue
- Allow to dry completely — even a few minutes of evaporation time is sufficient for acetone
- Wipe again with a tack cloth to remove any remaining dust particles
- Do not touch the cleaned surface with bare hands — skin oils immediately re-contaminate the surface
For galvanized metal specifically: New galvanized metal contains oils from the galvanizing process that actively repel paint. Clean with a dedicated galvanized metal etching solution or a diluted white vinegar wash (apply, scrub with a brush, rinse thoroughly, dry completely) before priming.
Step 4: Sand for Better Adhesion
Light sanding after cleaning and rust removal creates surface texture that paint grips mechanically. On shiny or previously painted metal, this step is especially important.
For bare metal: Use 220-grit sandpaper to smooth rough spots from coarser rust-removal sanding. Always finish with 220-grit or finer for the final pass before priming.
For previously painted metal in good condition: Scuff-sand with 320–400 grit to dull the gloss and create texture. You’re not removing paint — just removing the shine that prevents adhesion.
For chrome or very shiny surfaces: Use 400-grit wet/dry sandpaper, sanding wet for a finer scratch pattern. Chrome is particularly difficult for paint to bond to; mechanical sanding plus a self-etching primer is essential.
Wipe with a tack cloth after every sanding step.
Step 5: Apply the Right Primer
Primer is not optional on metal. It is the foundation of the entire paint system — the layer that bonds chemically to the metal and provides a surface that paint can adhere to. Using the wrong primer for your metal type is one of the most common causes of metal paint failure.
Primer Guide by Metal Type
Bare steel and iron → Rust-inhibiting metal primer This is the standard primer for most steel and iron projects. It contains corrosion inhibitors that continue protecting the metal even after paint is applied. Apply 2 thin coats, allowing each to dry fully.
Top products: Rust-Oleum Stops Rust Primer, Krylon ColorMaster Metal Primer, Zinsser Bulls Eye 1-2-3
Galvanized steel → Galvanized metal primer (or self-etching primer) Standard primers do not bond reliably to galvanized surfaces. Galvanized metal has a zinc coating that is chemically different from bare steel — you need a primer specifically formulated for it. Self-etching primers also work on galvanized surfaces by chemically etching the zinc layer.
Aluminum → Self-etching primer Self-etching primer contains phosphoric acid that lightly etches the aluminum surface, creating a chemical bond. Without this, paint on aluminum peels readily because aluminum doesn’t provide enough mechanical texture for standard primers to grip.
Cast iron → Rust-inhibiting primer (+ high-heat primer if needed) Cast iron used in radiators, woodstoves, or near heat sources needs a high-heat primer rated for the temperatures involved. For decorative cast iron not near heat, standard rust-inhibiting primer works well.
Previously painted metal → Bonding primer (if glossy) or spot-prime bare areas If the existing paint is sound, bonding primer over the sanded surface is sufficient. Bare metal spots exposed through sanding need a rust-inhibiting primer spot-applied before the bonding primer coat.
Primer Application
- Shake the primer can for 60–90 seconds
- Apply the first coat very lightly — a tack coat that’s nearly transparent
- Allow to become touch-dry per label instructions (usually 15–30 minutes)
- Apply a full second coat
- Allow to cure completely before applying color — typically 1–4 hours minimum, 24 hours for maximum adhesion
For outdoor metal or high-use surfaces, lightly sand the cured primer with 320-grit sandpaper before painting for the smoothest possible base.
Step 6: Choose the Right Spray Paint for Metal
The right paint for your metal project depends on where the metal is located, what it’s exposed to, and the finish you want.
Paint Types for Metal
Rust-inhibiting enamel spray paint The workhorse for most outdoor and indoor metal projects. Contains corrosion inhibitors that provide ongoing rust protection through the paint film. Hard, durable finish. Available in gloss, semi-gloss, and flat finishes.
Best for: Fences, gates, railings, outdoor furniture, garden tools, storage units
Top products: Rust-Oleum Stops Rust, Krylon ColorMaster, Rust-Oleum Protective Enamel
Direct-to-metal (DTM) spray paint Formulated to bond directly to metal without primer on compatible surfaces. Includes both primer and color in one coat. Convenient for smaller projects and touch-ups.
Best for: Small metal items, touch-up work, projects where primer application is impractical
High-heat spray paint Specially formulated to withstand temperatures from 1,000–1,200°F (some formulations higher). Standard paint will discolor, bubble, and peel on hot surfaces. Non-negotiable for grills, fire pits, exhaust systems, engine components, and fireplace inserts.
Best for: BBQ grills, fire pits, wood stoves, automotive exhaust, radiators near high heat
Top products: Rust-Oleum High Heat, Krylon High Heat Max, VHT FlameProof
Hammered finish spray paint Contains texturing agents that create a hammered metal appearance. Excellent for hiding surface imperfections and giving older metal a distinctive, high-end look.
Best for: Garden furniture, decorative metal, items with surface imperfections you want to conceal
Metallic spray paint Contains reflective metallic pigments for a shimmering, decorative finish. Available in gold, silver, bronze, copper, and many specialty finishes.
Best for: Decorative pieces, art projects, accent furniture
Paint Selection Guide by Project
| Project | Paint Type | Finish |
|---|---|---|
| Outdoor fence/gate | Rust-inhibiting enamel | Semi-gloss or gloss |
| Outdoor garden furniture | Rust-inhibiting enamel | Gloss or satin |
| Indoor metal fixtures | Standard enamel | Satin or semi-gloss |
| BBQ grill or fire pit | High-heat spray paint | Flat black |
| Automotive exhaust | High-heat spray paint | Flat black |
| Decorative metal pieces | Metallic or enamel | Any finish |
| Cast iron with surface flaws | Hammered finish | Hammered texture |
Step 7: Apply the Color Coat
With proper prep and priming behind you, color application follows standard spray paint technique — but with metal-specific considerations that affect the final result.
Before spraying:
- Shake the can thoroughly for 2 full minutes — metal paints, especially rust-inhibiting formulas, have heavier pigment loads that settle more than standard paints
- Check ambient temperature: ideal range is 60–85°F. Metal surfaces in direct sun can be 20–30°F hotter than air temperature — this causes paint to dry before leveling, creating orange peel texture. Paint in shade or early morning for outdoor metal
- Check humidity: below 60% is ideal. High humidity slows drying and can cause blushing (milky haze) in the finish
Application technique:
Hold the can 10–12 inches from the surface. Move your entire arm in smooth, consistent passes — not just your wrist. Start and stop each pass beyond the edge of the metal.
The coat schedule for metal:
- Coat 1 (tack coat): Ultra-thin, barely visible — gives subsequent coats something to bond to and prevents running
- Coat 2 (10–15 min later): Full, even coverage pass
- Coat 3 (10–15 min later): Final coverage, even film
Three thin coats always outperform one thick coat on metal — especially on vertical surfaces where drips and runs are common.
Edges and corners: Metal edges and inside corners accumulate paint faster than flat surfaces. Move faster when passing over these areas, or reduce the amount of paint you apply there by holding the can slightly farther away.
Step 8: Apply Clear Coat (For High-Use or Outdoor Metal)
For metal exposed to the elements, UV light, or regular handling, a clear topcoat over the color provides critical additional protection.
Benefits for metal specifically:
- UV protection prevents color fading in outdoor metal
- Seals the color coat against moisture infiltration — important for rust prevention
- Adds scratch resistance for handled items
- Increases gloss for a more finished appearance
Clear coat selection: Use a clear coat compatible with your base paint. Most enamel-based color coats work with standard automotive or general-use clear coats. For high-heat applications, use a high-heat clear coat — standard clear will discolor and peel at elevated temperatures.
Application: Two thin coats, 10–15 minutes apart. Allow to cure fully (24–48 hours) before exposure to rain or handling.
Metal-Specific Project Guides
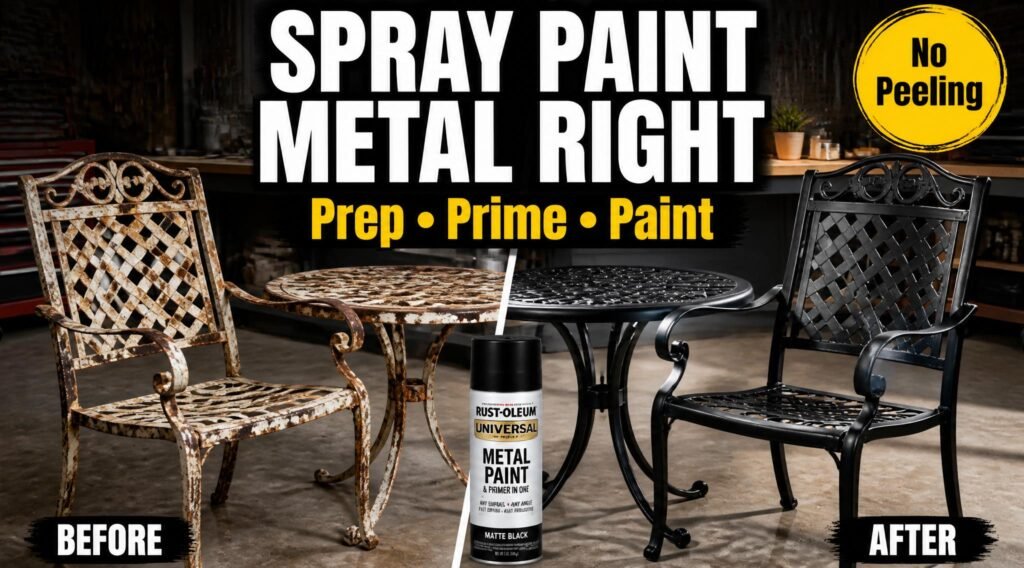
Outdoor Furniture (Steel or Cast Iron)
The most common metal spray painting project. Key considerations:
- Sand and treat any rust before priming — even light surface rust will spread under paint
- Use rust-inhibiting primer + rust-inhibiting enamel color coat
- Apply a clear coat for UV and moisture protection
- Allow the full cure time (5–7 days) before placing cushions or heavy use
Metal Fences and Gates
Large surface area projects where technique consistency matters most. Use a spray trigger handle to reduce fatigue and maintain consistent distance over long runs. Work in sections and maintain a wet edge to avoid visible lap marks. Choose semi-gloss or gloss finishes — they repel water more effectively than flat finishes on exposed metal.
Galvanized Metal (Gutters, Ductwork, Outdoor Furniture)
The critical step is using galvanized metal primer or self-etching primer — nothing else bonds reliably to galvanized surfaces long-term. Allow the etching primer to fully cure before applying color. For our detailed guide on painting over difficult surfaces including galvanized metal, see our article on best spray paint techniques for a professional finish.
Automotive Metal (Panels, Trim, Exhaust)
For body panels and exterior trim, use automotive-grade primer and color-matched automotive spray paint. Self-etching primer is standard for bare metal automotive work. Wet sanding between coats (400 → 800 → 1500 → 2000 grit) followed by polish delivers professional results. For exhaust components and areas near heat, use high-heat paint rated for the appropriate temperature range. Our complete guide to spray painting a car at home covers automotive metal work in full detail.
Outdoor Metal Projects
When painting metal outdoors, weather conditions become a critical variable. Humidity, wind, and temperature all affect how paint bonds and dries on metal surfaces. For outdoor-specific guidance including how to manage weather conditions, wind control, and UV-resistant finishes, our guide to spray painting outdoors covers every environmental factor.
Troubleshooting Metal Spray Paint Problems
Paint Is Peeling or Flaking
Cause: Inadequate surface prep (contamination, insufficient rust removal, wrong primer for metal type), or primer not fully cured before painting.
Fix: Strip the paint back to bare metal, treat rust completely, clean thoroughly, apply the correct primer for your metal type, allow full cure before painting. There’s no shortcut fix for adhesion failure — it requires starting over correctly.
Rust Is Bleeding Through Paint
Cause: Rust was not fully removed before painting, or the metal was re-exposed to moisture before the paint fully cured.
Fix: Sand or grind back to bare metal in the affected area, treat remaining rust with rust converter, apply rust-inhibiting primer, reapply color. Ensure full cure before rain or moisture exposure.
Paint Won’t Dry or Stays Tacky
Cause: Temperature too low (below 50°F), humidity too high, coats applied too thick, or paint applied over contaminated surface.
Fix: Move the piece to a warmer, drier environment. If tacky after 48 hours in ideal conditions, the surface contamination or paint incompatibility is likely the cause — strip and restart. For detailed guidance on tacky paint issues, our guide to fixing spray paint that won’t stick covers every cause and solution.
Orange Peel Texture
Cause: Surface temperature too high (direct sun heating metal), holding can too far away, or paint drying before leveling.
Fix: Wet sand with 800-grit, then 1500-grit to level the texture. Polish with compound. For future coats, paint in shade, hold can at 10–12 inches, and apply in cooler temperatures.
Runs and Drips
Cause: Coats applied too thick, holding can too close, or moving too slowly.
Fix: Let the run dry completely (24–48 hours), sand smooth with 400-grit sandpaper, wipe clean, and reapply thin coats. Our complete guide to fixing spray paint drips and runs covers detailed repair techniques.
Safety: Spraying Metal Paint
Metal spray paints — especially rust-inhibiting enamels, self-etching primers, and high-heat formulas — contain solvents and other chemicals that require proper safety measures.
Always:
- Wear a respirator rated for organic vapors (not just a dust mask)
- Work in well-ventilated areas or outdoors when possible
- Wear nitrile gloves — spray paint penetrates skin and many solvents are absorbed transdermally
- Keep away from open flames — aerosol paints are flammable
For comprehensive spray painting safety guidance covering all paint types and environments, our complete spray painting safety guide covers everything from respirator selection to first aid.
Metal Spray Painting Checklist
Before starting any metal project:
- [ ] Metal type identified (steel, galvanized, aluminum, cast iron)
- [ ] Rust assessed and treated (converter applied if needed)
- [ ] Surface sanded smooth (80 → 220 grit progression for rust areas)
- [ ] Surface cleaned with acetone or mineral spirits
- [ ] Tack cloth wipe completed
- [ ] Correct primer selected for metal type
- [ ] Primer applied (2 thin coats, fully cured)
- [ ] Color coat selected (rust-inhibiting, high-heat, or standard enamel per project)
- [ ] Temperature 60–85°F confirmed
- [ ] Humidity below 60% confirmed
- [ ] 3 thin color coats applied with proper dry time between
- [ ] Clear coat applied if outdoor/high-use application
- [ ] Full cure time respected before use
FAQs
Can I spray paint over rusted metal without sanding? Not reliably. You can use a rust converter first to stabilize the rust chemically, but some surface preparation is always needed for paint to bond properly. Painting directly over active, loose rust — without any prep — guarantees peeling within months.
What’s the best spray paint for outdoor metal furniture? A rust-inhibiting enamel spray paint (Rust-Oleum Stops Rust, Krylon ColorMaster, or similar) applied over a rust-inhibiting primer, with a clear topcoat for UV protection. Semi-gloss or gloss finishes repel water better than flat finishes on outdoor metal.
Do I need primer if the spray paint says “direct to metal”? For small projects and touch-ups, DTM products perform acceptably without separate primer. For projects exposed to weather, UV light, or mechanical wear — primer significantly extends the life of the finish. When in doubt, prime.
How long before painted outdoor metal can get wet? Touch-dry in 1–4 hours for most metal enamels. Handle-dry in 24 hours. Full weather resistance typically requires 5–7 days of full cure. Avoid rain for at least 48 hours after painting for best results.
Can I paint cast iron with regular spray paint? For decorative cast iron not exposed to heat, rust-inhibiting enamel spray paint over a rust-inhibiting primer works well. For cast iron near heat sources (radiators, wood stoves, fire pits), use high-heat spray paint rated for the temperatures involved — regular paint will discolor and peel.
Final Thoughts
Metal spray painting rewards those who respect the prep work. The rust removal, the correct primer for your specific metal, the thin coats — these steps aren’t optional add-ons. They’re what separates a finish that lasts five years from one that starts peeling in five months.
Get the prep right, use the right primer for your metal type, apply thin color coats in appropriate conditions, and seal with a clear coat for outdoor or high-use applications. Follow that sequence and you’ll get a finish that looks factory-finished and outlasts the shortcuts by years.