How to Spray Paint Metal: The Complete Rust-Proof Guide for a Flawless, Professional Finish (2026)
By Rodney Shiner | Application Guides | Spray Painter Guide
Metal is everywhere in your home and yard — patio furniture, railings, mailboxes, radiators, gates, tool cabinets, light fixtures, even old filing cabinets you can’t bear to throw out. And almost all of it ends up looking the same way after a few years: dull, chipped, spotted with rust. The good news is that metal is one of the most rewarding surfaces to spray paint. Unlike plastic, which fights you every step of the way, metal accepts paint well once it’s properly prepped — and a $15 mailbox post can look like a $150 designer piece with the right technique.
But “properly prepped” is doing a lot of work in that sentence. Metal has its own failure points — rust bleeding back through fresh paint, flash rusting during humid weather, and coatings that look great for a month before they start peeling in sheets. This guide walks through the entire process, from choosing the right paint and tools to the exact steps that keep a metal finish looking factory-fresh for years, not months.
Why Metal Behaves Differently Than Other Surfaces
Every surface has its own personality when it comes to spray paint. Wood is forgiving. Plastic is stubborn. Metal sits somewhere in between, but with one characteristic that makes it unique: oxidation. The moment bare steel or iron is exposed to air and moisture, it starts rusting — and that process doesn’t stop just because you’ve sprayed paint over it. If rust isn’t fully addressed before painting, it will continue eating away underneath the new coat, eventually bubbling and lifting the paint from the inside out.
Metal also conducts heat rapidly, which affects how paint cures. A metal chair left in direct sun can reach temperatures that cause spray paint to dry too fast on the surface while staying soft underneath, leading to a tacky, easily-scratched finish. And smooth metals like aluminum or galvanized steel are naturally slick, so paint has almost nothing to physically grip onto without the right prep.
Three factors decide whether a metal paint job lasts:
- Surface preparation — rust removal, degreasing, and scuffing
- Priming — using a primer formulated for metal, not a generic all-surface product
- Paint chemistry — enamel, epoxy, or specialty rust-inhibitive formulas, matched to the environment the piece will live in
Get these three right and even inexpensive rattle-can paint will outperform an expensive job done on unprepped metal.
Identifying Your Metal Type
Not all metal is created equal, and knowing what you’re working with changes your whole approach.
- Bare/raw steel or iron — Highly reactive, rusts quickly, needs a rust-inhibitive primer.
- Galvanized steel (fences, gutters, HVAC ducts) — Coated in zinc, which resists rust but also resists paint adhesion. Needs a galvanized-metal-specific primer or vinegar-based etching wash.
- Aluminum (patio furniture, window frames, siding) — Doesn’t rust the same way steel does, but forms a natural oxide layer that blocks adhesion. Needs light sanding and a self-etching primer.
- Cast iron (radiators, skillets used decoratively, vintage furniture) — Porous surface that holds onto old paint, rust, and grease deep in its texture; requires more aggressive cleaning.
- Chrome or stainless — Extremely smooth and adhesion-resistant; almost always needs an adhesion-promoting primer, similar in concept to the adhesion promoters used for tricky plastics.
If you’re not sure what you have, a magnet test helps: if a magnet sticks firmly, it’s likely steel or iron. If it doesn’t stick at all, you’re probably dealing with aluminum or stainless steel — both of which need a dedicated etching primer rather than a standard rust-inhibitive one.
What You’ll Need
Cleaning and prep:
- Wire brush or wire wheel attachment for a drill
- 120–220 grit sandpaper (finer for smooth existing finishes, coarser for heavy rust)
- Rust remover or rust converter (phosphoric-acid based products work well)
- Degreaser or dish soap and water
- Isopropyl alcohol (90%+) for a final wipe-down
- Tack cloth or lint-free rags
Painting tools: Rattle cans work fine for small to medium pieces. For furniture sets, railings, or anything with a lot of surface area, an HVLP spray gun gives more control and faster coverage. If you’re deciding between tools, our breakdown of different spray gun types covers the tradeoffs between conventional, airless, and HVLP systems in more detail.
Products:
- Rust-inhibitive metal primer (for bare/rusted steel and iron)
- Self-etching primer (for aluminum, galvanized metal, chrome)
- Metal-specific enamel, epoxy, or hammered-finish spray paint
- Clear topcoat rated for exterior use, if the piece will live outdoors
Safety gear:
- Respirator or well-fitted particulate mask (not just a paper dust mask)
- Nitrile gloves
- Safety glasses
- Adequate ventilation, or work outdoors on a calm day
Choosing the Right Paint Formula for the Job
Not every “spray paint for metal” can on the shelf is built the same way, and picking the wrong one is one of the quieter reasons metal projects fail early.
Alkyd/oil-based enamels are the traditional standby for metal. They cure into a hard, glossy shell that resists chipping and holds up well to handling, which makes them a solid default for railings, tool cabinets, and furniture that gets touched often. The tradeoff is a longer full-cure time and stronger odor during application, so ventilation matters more here than with water-based options.
Water-based acrylic enamels have closed much of the performance gap with oil-based formulas in recent years. They dry faster, smell less, and clean up easier, making them a good choice for indoor pieces or anyone painting in a garage without heavy-duty ventilation. They’re slightly less abrasion-resistant than oil-based enamel, so they suit decorative pieces better than high-wear ones.
Epoxy-based paints are the toughest option, forming a chemical bond that resists solvents, scratches, and heavy wear. They’re the right call for things like tool chests, workbenches, or railings in high-traffic commercial or multi-family settings. The tradeoff is a shorter working window once mixed or sprayed and a less forgiving application process — mistakes are harder to correct mid-coat.
Hammered and textured finishes are formulated specifically to hide surface imperfections, which makes them a smart choice for pitted or lightly rusted metal that’s been treated but still shows texture. They develop their finish as they cure, so they need a lighter touch than smooth finishes — extra coats can flatten the hammered texture instead of enhancing it.
Rust-inhibitive “direct to metal” paints combine primer and topcoat properties in one product. They’re convenient and genuinely effective on metal with light to moderate rust history, but they’re not a substitute for a dedicated primer on heavily rusted, galvanized, or aluminum surfaces — those still benefit from a separate primer step for long-term durability.
When in doubt, match the paint to the piece’s environment: indoor and lightly handled favors water-based acrylic enamel, outdoor and weather-exposed favors oil-based enamel or a rust-inhibitive DTM formula, and high-wear or industrial favors epoxy.
How Weather and Temperature Affect the Finish
Metal’s fast heat transfer makes it far more sensitive to weather conditions than wood or plastic during application. A few conditions to watch for:
Direct sun and hot surfaces. A metal railing or chair left in full sun can reach a surface temperature well above the surrounding air. Spraying onto a hot surface causes the outer layer of paint to skin over almost instantly while solvent underneath is still trying to escape, which leads to trapped bubbles, wrinkling, or a soft, easily-marked finish days later. Move the piece into shade, or paint early morning or evening when the metal has cooled.
Cold temperatures. Spray paint doesn’t atomize as well when the can itself is cold, leading to a spattery, uneven pattern. It’s also slower to cure below roughly 50°F (10°C), which extends the window during which dust, insects, or moisture can mar the surface. Warming the can to room temperature (never with direct heat) before spraying and working in temperatures above 50°F produces far more consistent results.
Humidity. High humidity slows solvent evaporation, which can cause a hazy, “blushing” white film to form as the paint dries — trapped moisture scattering light within the coating. It also extends the tacky window during which airborne dust and pollen readily stick to the surface. Aim for a dry day, ideally under 70% relative humidity, and avoid painting metal that will sit outdoors overnight before the finish has had a chance to set.
Wind. Outdoor painting in more than a light breeze carries overspray unpredictably and can blow debris into a wet coat. A calm day, or a sheltered spot like a garage with the door open for ventilation, gives far more control.
Step 1: Remove Rust and Loose Material
Skip this step and everything after it is wasted effort. Start with a wire brush or wire wheel to knock off loose rust, flaking paint, and scale. Work in overlapping passes until you reach either bare, solid metal or the intact original finish. For pitted or deeply rusted areas, follow up with a rust converter — these products chemically transform rust into a stable, paintable surface rather than just masking it, which matters because paint applied directly over active rust will fail within weeks.
For stubborn corrosion in tight corners (hinges, decorative scrollwork), a small wire brush attachment or even a toothbrush loaded with rust remover solution reaches spots a full-size brush can’t.
Step 2: Sand for a Paint-Ready Profile
Once rust is handled, sand the entire surface — not just the rusted spots. This does two things: it smooths transitions between bare metal and old paint so you don’t get visible ridges, and it creates a slightly roughened “tooth” that gives new paint something to physically grip. Use 120-grit for heavier correction, then move to 220-grit for a final smoothing pass. On galvanized or aluminum surfaces, a light scuff is enough — you’re not trying to strip the metal down, just breaking the glossy surface tension.
Wipe away sanding dust thoroughly. Any dust left behind gets trapped under primer and shows up as a gritty texture in the final finish.
Step 3: Degrease and Clean
Metal surfaces — especially anything that’s spent time in a garage, kitchen, or workshop — accumulate oils, grease, and handling residue that are often invisible but will sabotage adhesion just as effectively as they do on plastic. Wash with a degreaser or dish soap and warm water, rinse thoroughly, and let the piece dry completely. Follow with a final wipe using isopropyl alcohol on a lint-free cloth to remove any last residue.
From this point forward, handle the piece with clean gloves. Bare-hand contact reintroduces the same skin oils you just spent ten minutes removing.
Step 4: Mask and Set Up Your Workspace
Cover anything you don’t want painted with painter’s tape and plastic sheeting or newspaper. For furniture with moving parts (hinges, drawer slides, wheels), consider disassembling what you can — it’s far easier to get an even coat on separated pieces than to work paint into a joint.
Set up your workspace with good airflow. Outdoors on a dry, low-wind day is ideal. If working indoors, open windows and use a fan to push fumes out rather than just circulating them. Avoid painting in direct, intense sun, since it causes the surface of the paint to skin over before the layer underneath has flashed off — a common cause of wrinkling.
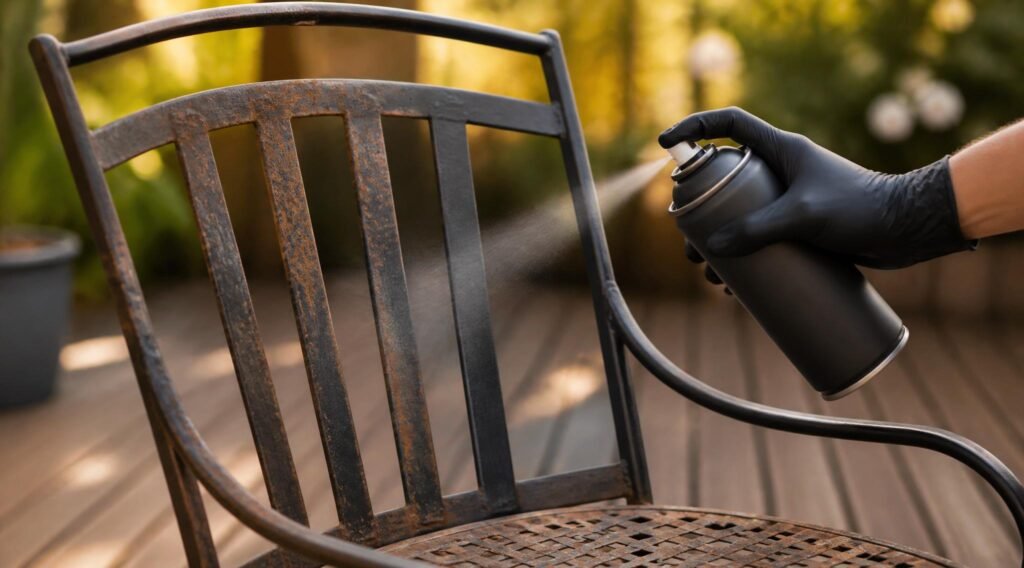
Step 5: Apply Primer
This is the step people skip most often, and it’s the one that determines whether your paint job survives one season or five. Choose based on your metal type:
- Rusted or bare steel/iron: Rust-inhibitive primer, applied in 2 light coats, 10–15 minutes apart
- Aluminum, galvanized steel, chrome: Self-etching primer, which uses a mild acid to chemically bite into the surface
Hold the can or gun 8–12 inches from the surface and use smooth, overlapping horizontal passes, keeping your hand moving the entire time to avoid pooling. Let the primer cure fully according to the label — usually 30 minutes to an hour before color coats, though some products want a full 24 hours. Rushing this step is one of the most common causes of adhesion failure.
Step 6: Apply the Color Coat
With primer cured, apply your metal-specific spray paint in thin, even layers rather than one heavy coat. Two to three light coats, 10–15 minutes apart, will always outperform a single thick coat — heavy application leads to drips, uneven sheen, and extended cure times that trap solvents beneath a dry-looking surface.
Keep the can moving at a consistent speed and distance throughout each pass, starting and stopping your spray just off the edge of the piece rather than directly on it. This prevents the heavy buildup that happens when a spray pattern starts or stops mid-surface.
If you’re using a hammered, textured, or metallic-flake finish, resist the urge to overwork it — these formulas are engineered to develop their texture as they dry, and extra coats can flatten or muddy the effect.
Step 7: Clear Coat (For Outdoor or High-Wear Pieces)
Anything that will live outside — railings, patio furniture, mailboxes, garden décor — benefits enormously from a UV-resistant clear topcoat. It adds a protective barrier against moisture, which is the single biggest threat to a metal finish’s longevity, and it also slows down color fading from sun exposure. Apply 2 thin coats, allowing 10–15 minutes between them, and let the piece cure fully — typically 24–48 hours — before it’s handled roughly or exposed to rain.
Step 8: Cure Time and Handling
“Dry to the touch” and “fully cured” are not the same thing. Most metal spray paints feel dry within an hour but need 24 to 72 hours to reach full hardness, depending on temperature, humidity, and coat thickness. Avoid stacking painted pieces, leaning objects against a freshly painted surface, or exposing it to rain during this window. Furniture especially should sit unused for at least 48 hours before regular use.
Metal-Specific Projects Worth Knowing
A few metal surfaces come up often enough to deserve their own notes:
Outdoor furniture and railings overlap heavily with general furniture painting technique, but with the added rust and weather-exposure considerations above — our complete furniture spray painting guide covers the broader process if your piece has a mix of materials.
Metal fencing and gates deal with the same UV and moisture exposure as painted wood fencing, just with rust added to the equation — see our fence painting guide for coverage-rate and weather-timing tips that apply to metal fences as well.
Old spray-painted metal you want to refresh doesn’t always need to be stripped back to bare metal. If the existing finish is intact, adhered well, and not chalky or peeling, you can often paint directly over it after a scuff-sand and degrease — our guide on painting over existing spray paint walks through how to tell if a surface is a good candidate for that shortcut versus one that needs full rust remediation.
Troubleshooting Common Metal Paint Problems
Paint is bubbling or peeling within weeks. Almost always active rust that wasn’t fully treated before painting, or missing primer. The fix is to strip back to the affected area, treat any remaining rust, prime properly, and repaint.
Rust spots reappear through the new paint. Rust was converted or covered but not fully neutralized, often in pitted areas a wire brush couldn’t reach. A rust converter product applied directly into the pits before priming resolves this.
Finish feels tacky days after painting. Usually caused by coats applied too heavily, too close together, or in high humidity, trapping solvent underneath a surface that looks dry. Let it continue curing in a warm, dry, ventilated space; in stubborn cases, the tacky layer needs to be sanded back and reapplied thinner.
Paint has a rough, gritty texture. Dust or debris wasn’t fully removed before priming, or the piece was painted outdoors in windy conditions that carried debris into wet paint. Sand smooth and repaint in a cleaner environment.
Uneven sheen or blotchy color. Usually inconsistent coat thickness — some areas got two passes, others got four. Slow down and use deliberate, evenly overlapping passes at a consistent distance.
Safety Considerations
Spray paint fumes and overspray particulates are a real hazard, especially in enclosed garages or workshops. Rust removers and etching primers can also contain acids or strong solvents. Always work in a well-ventilated space, wear a proper respirator rather than a basic dust mask, and keep aerosol cans away from open flames or pilot lights given their flammable propellants. For a full rundown of protective measures, ventilation setup, and product-specific hazards, see our complete spray paint safety guide.
Frequently Asked Questions
Do I need a primer if the spray paint says “primer included”? For clean, non-rusted metal, an all-in-one paint-and-primer product can work. For anything with rust history, aluminum, or galvanized surfaces, a dedicated primer step still meaningfully improves adhesion and rust resistance — it’s a 20-minute step that prevents a much longer repaint down the line.
Can I spray paint metal that’s already rusted without removing all the rust? Light surface rust can be treated with a rust converter and painted over directly. Heavy, flaking, or pitted rust needs to be mechanically removed first — paint applied over active corrosion will fail regardless of how good the paint itself is.
How many coats of spray paint does metal need? Typically one primer application (1–2 light coats) and 2–3 light color coats, plus a clear topcoat for outdoor pieces. Thin, multiple coats always outperform fewer heavy ones.
Is enamel or epoxy better for metal? Enamel is easier to apply, more widely available, and performs well for most household and outdoor metal projects. Epoxy offers superior chemical and abrasion resistance and suits high-wear surfaces like tool cabinets, railings in high-traffic areas, or metal exposed to harsh conditions, but it’s less forgiving to apply and has a shorter working window.
How long before I can use freshly painted metal furniture? Wait at least 48 hours before regular use, and up to a week before exposing it to heavy rain or moving it outdoors permanently, to allow full cure.
Final Thoughts
Metal rewards patience more than almost any other surface. The painting itself — the actual spraying — is often the fastest part of the whole project. It’s the rust removal, degreasing, and priming that take real time, and they’re also the steps that decide whether your work lasts five years or five weeks. Do the prep properly, match your primer to your metal type, and build your color in thin layers, and a tired, rusted piece of metal furniture or fencing can look genuinely new again — and stay that way.