How to Spray Paint Glass: The Complete Guide to Vases, Jars & Glassware (2026)
By Rodney Shiner | Application Guides | Updated July 2026
Reading Time: ~13–15 minutes
Glass is one of the most common materials sitting around unused in most homes — old vases, mason jars, wine bottles, mismatched candle holders, outdated light fixtures — and it’s also one of the most rewarding surfaces to transform with spray paint. A five-dollar can and an afternoon can turn a forgotten thrift-store vase into something that looks like it came from a design boutique.
Glass is also one of the trickiest surfaces on this site to get right. It’s completely non-porous, which means paint has nothing to physically grip onto the way it does with wood grain or a scuffed metal surface. Skip the right prep steps and you’ll watch your paint peel off in sheets within weeks, no matter how good the color coat looks on day one. The good news is that the fix is straightforward once you understand why it happens — this isn’t a surface that requires exotic products or professional equipment, just the right sequence of steps done in the right order.
This guide covers exactly how to get lasting results: the right paint types, prep and etching techniques, application, curing, and the troubleshooting fixes for when things go sideways. If you’re new to spray painting in general, our tips for spray painting guide covers the fundamentals this article builds on.
Can You Really Spray Paint Glass?
Yes — glass takes spray paint well once it’s properly prepped, and painted glass can genuinely last for years with the right process. The catch is that glass behaves nothing like the other surfaces covered on this site. Wood has grain and pores that grab primer. Metal etches and rusts, giving paint physical texture to bond to. Even plastic, notoriously difficult, has surface treatments that help paint adhere.
Glass offers none of that. It’s smooth, hard, and chemically inert, which is exactly why it holds liquid so well and exactly why paint struggles to stick to it long-term without help. The fix isn’t a special mysterious product — it’s a combination of surface texture (light sanding) and the right paint chemistry (enamel or paint formulated for glass and slick surfaces).
Choosing the Right Spray Paint for Glass
Not every spray paint bonds reliably to glass, and the finish you choose changes both the look and the durability of the final project.
| Paint Type | Finish/Look | Best For | Durability |
| Acrylic enamel (glass/multi-surface labeled) | Solid, opaque color | Vases, jars, decor items, frequent handling | Good–Excellent with sealant |
| Stained/tint glass spray | Translucent, colored-glass look | Bottles, windows, light fixtures where light passes through | Moderate — needs a clear topcoat |
| Frosted glass spray | Matte, etched-glass appearance | Privacy panels, decorative jars, bathroom windows | Good |
| Chalk-finish spray paint | Ultra-matte, textured | Farmhouse/rustic decor, distressed looks | Moderate — more prone to scuffing |
| Metallic spray paint | Reflective, shimmering | Accent pieces, candle holders, ornamental glass | Good with sealant |
Whatever finish you choose, check the label specifically mentions glass or “multi-surface” compatibility. General-purpose spray paints not labeled for slick, non-porous surfaces are far more likely to peel, regardless of how carefully you apply them.
Step 1: Clean the Glass Thoroughly
Any oil, fingerprint, dust, or label residue left on the surface becomes a weak point paint can’t bond through. Wash the item in warm, soapy water, then wipe it down with isopropyl alcohol on a lint-free cloth — this removes the invisible oily film that plain soap and water often leaves behind.
If you’re painting a jar or bottle that had a label, use warm water and a bit of vegetable oil or a dedicated adhesive remover to fully dissolve the glue residue first. Any leftover sticky patch will telegraph straight through your paint job.
Step 2: Create Texture for Adhesion (Don’t Skip This)
This is the step most tutorials gloss over and the one most responsible for peeling paint later. Glass is too smooth for paint to physically grip, so you need to create microscopic texture the paint can hold onto.
- Wet-sand the surface with 220-grit sandpaper (used wet, in small circular motions) to create a light, even texture — you’re not trying to visibly scratch the glass, just dull the surface slightly.
- Rinse and dry completely after sanding, since any leftover grit or slurry will show up under your paint.
- Alternatively, a light coat of a bonding primer formulated for glass and slick surfaces can substitute for or supplement sanding, particularly on curved or detailed pieces that are awkward to sand evenly.
Step 3: Prime (When You Need To, and When You Don’t)
Priming isn’t always required on glass, but it meaningfully improves durability, especially for opaque finishes and anything that will be handled often. The same core logic covered in our primer guide for plastic applies here — priming exists to bridge the gap between a slick, low-adhesion surface and your color coat, and glass has exactly that same low-adhesion problem plastic does.
- Skip primer if you’re using a translucent stained-glass or tint spray, since primer will make the surface opaque and defeat the see-through effect.
- Use a primer labeled for glass or multi-surface use if you’re going for a solid, opaque color and want maximum durability.
- Apply primer in thin, even coats and let it fully dry per the label before moving to color — rushing this step is a common cause of adhesion failure later.
Step 4: Apply the Color Coat
Once your surface is clean, textured, and (if needed) primed, application technique follows the same fundamentals as any other spray paint project — with a couple of glass-specific adjustments. For general technique refreshers on distance, speed, and coat thickness, our spray painting tips guide covers the basics in more depth.
- Hold the can 8–12 inches from the surface and use smooth, overlapping passes — closer distances overload glass with paint fast since there’s no porous surface to help absorb it.
- Apply a light “tack coat” first — a thin, almost translucent first pass that gives the next coat something to grip, which matters more on glass than on any other surface covered on this site.
- Build color with 2–4 thin coats rather than 1–2 heavy ones, waiting the label’s recommended flash time between each.
- For hollow items like vases or jars, you generally only need to paint one side (usually the outside) — this preserves the smooth interior and reduces material and dry time.
- Elevate the piece off your work surface (a spray can lid or a lazy Susan works well) so you can rotate it without touching wet paint.
Drying and Curing Time on Glass
Touch-dry typically happens within 10–20 minutes on glass, which can be misleading — that’s just the surface skinning over, not the paint reaching real hardness. Handle-dry (safe to move without smudging) usually takes 1–2 hours. Full cure, where the paint has reached its maximum hardness and chemical resistance, generally takes 5–7 days for enamel-based glass paints, sometimes longer in cool or humid conditions.
This distinction matters more on glass than almost any other surface, because glass items get handled constantly — picked up, set down, filled with water, wiped clean. Treat anything painted in the last week as fragile, even if it feels dry to the touch.
Step 5: Seal It (Strongly Recommended)
A clear topcoat is optional on decorative pieces that sit untouched on a shelf, but it’s close to mandatory on anything that gets picked up, washed, or used regularly — vases that get refilled with water, candle holders, or jars used for storage. Our clear coat and matte topcoat guide covers how to choose between gloss, satin, and matte protective finishes depending on the look you’re going for.
Apply the clear coat only after your color coat has fully cured — sealing too early traps solvents underneath and is a common cause of the cloudy or hazy look painted glass sometimes develops.
Working with Curved, Textured, or Detailed Glass
Not all glass is a simple flat-sided jar. Curved vases, faceted candle holders, and glass with raised patterns or embossed logos each present their own application challenges, and it’s worth adjusting your approach rather than treating every piece the same way.
On curved surfaces, rotate the piece steadily as you spray rather than trying to cover the whole item from one angle — a lazy Susan turntable makes this dramatically easier and produces far more even coverage than spinning the piece by hand between passes. For faceted or geometric glass, spray at a slight angle to each facet rather than straight-on, since flat spraying tends to build up unevenly in the recessed areas between facets.
Embossed logos and raised patterns (common on repurposed food jars and vintage bottles) can actually work in your favor — a technique called dry-brushing, where a small amount of a contrasting paint color is lightly brushed over just the raised details after the base coat dries, makes those patterns pop rather than disappear under a flat coat of color.
Etching Cream vs. Sanding: Which Should You Use?
Both create the surface texture paint needs to grip, but they work differently and suit different projects. Wet-sanding with fine-grit sandpaper is faster, requires no special chemicals, and is fully reversible if you change your mind about a project — it’s the right default choice for most spray paint projects covered in this guide.
Glass etching cream works chemically rather than mechanically, permanently altering the surface of the glass to create a frosted texture. It’s a stronger, more uniform texture than sanding produces, which is why some experienced painters use it as a prep step before painting particularly smooth or curved glass where sanding evenly is difficult. The tradeoff is that etching cream is a caustic product requiring gloves and careful handling, and the etched texture is permanent, so it’s a bigger commitment than a quick sanding pass.
For most home decor projects — jars, vases, candle holders — sanding is sufficient and simpler. Reach for etching cream specifically when you’re struggling to get an even texture on a heavily curved or oddly shaped piece, or when you want the frosted-etched look as part of the finished design rather than just as a prep step. Whichever method you choose, resist the temptation to skip it entirely on a piece you actually care about — it’s the single highest-leverage step in the entire process.
Budgeting Time and Materials
A single small-to-medium glass project — one vase or a handful of mason jars — typically needs one can of color spray paint and, if you’re using one, a small can of primer or bonding spray, running roughly $15–$30 total in materials for most projects. Sandpaper, isopropyl alcohol, and a lint-free cloth are inexpensive one-time purchases that will cover many future projects.
Time-wise, budget about 20–30 minutes for cleaning and sanding, 10–15 minutes per coat for application (with 3–4 coats being typical), and then several days of hands-off cure time before the piece sees regular use. The active work is genuinely quick — it’s the patience during curing that determines whether the project lasts.
A Note on Food and Drink Contact
“Non-toxic” on a spray paint label is not the same as food-safe. Painted glass should not come into direct contact with food or beverages, even with a clear sealant on top. If you’re painting a vase, pitcher, or bowl that might hold food or drinks, paint only the exterior and leave the interior surface untouched — this is standard practice among experienced glass painters and worth building into your project from the start rather than fixing after the fact.
Project Ideas Worth Trying
- Ombre vases — graduate from full color at the base to bare glass at the rim using light, controlled passes
- Frosted mason jars for rustic wedding centerpieces or bathroom storage
- Metallic-painted candle holders for a quick, glam accent update
- Stained-glass effect wine bottles as budget-friendly vases or lamp bases
- Painted glass light fixture shades for a fast lighting refresh without an electrician
If a project pairs glass with wood or painted cabinetry — a glass-front cabinet door, for instance — our cabinet spray painting guide covers the wood side of that project so both surfaces end up finished to the same standard.
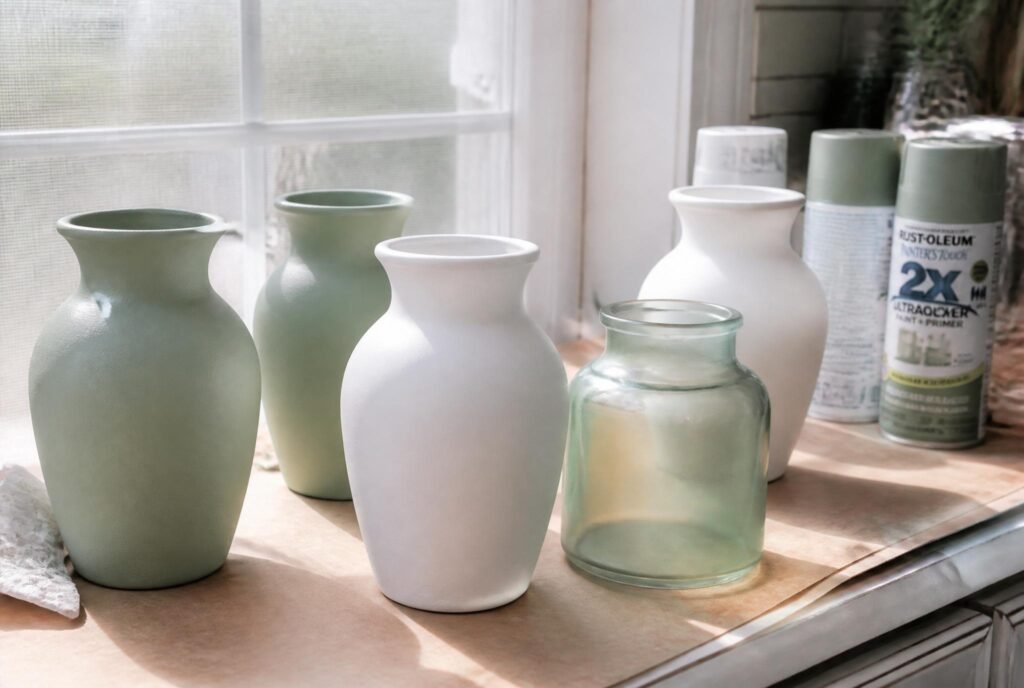
Color and Finish Trends Worth Considering
Sage green, warm terracotta, and soft matte white have been the standout choices for painted glass vases and jars through 2026, favoring muted, organic tones over the high-gloss brights that were popular a few years back. Matte and chalk finishes in particular pair well with dried or faux florals, which has helped drive their popularity for home decor projects.
Metallic finishes — brushed gold, aged bronze, matte black with gold rim accents — remain a reliable choice for candle holders and accent pieces where you want something that reads as intentional and higher-end rather than obviously a DIY project. If you’re painting multiple pieces for a single space, sticking to one finish family (all matte, or all metallic) across the set reads as far more cohesive than mixing gloss and matte pieces together.
Troubleshooting Common Problems
Peeling or flaking after it seemed dry: almost always a prep issue — either the surface wasn’t sanded or cleaned thoroughly, or the color coat went on before primer had fully cured. Sand back the affected area, clean it again, and reapply primer and paint. Bubbling on glass is usually caused by trapping solvents under a coat applied too heavy or too fast — thin, patient coats are the fix.
Drips and runs: glass has zero absorption, so heavy coats run more readily here than on almost any other surface. Our guide to fixing spray paint drips and runs covers the sand-and-recoat repair process step by step if you catch a run after it’s already dried.
Cloudy or hazy finish: usually caused by sealing before the color coat fully cured, or by humidity during application. Let the piece cure fully in a dry space before adding a topcoat, and avoid painting glass on humid days when possible. If a piece already has this haze, a light buff with a microfiber cloth sometimes improves clarity once fully cured, though the most reliable fix is preventing it in the first place by respecting cure times.
Caring for Painted Glass
- Hand wash only, with mild soap and a soft cloth — painted glass should never go in the dishwasher, since heat and detergent will degrade the finish quickly.
- Avoid abrasive sponges or scrubbers, which can scratch even a fully cured, sealed finish.
- Keep painted glass out of direct, prolonged sunlight where possible, since UV exposure gradually fades most spray paint finishes over time, glass included.
Safety Reminder
Glass projects are usually small and often done indoors at a kitchen table or craft space — exactly the setting where ventilation gets skipped because the project feels too small to bother. It isn’t. A small can of spray paint in an unventilated room still builds up solvent concentration fast in a confined space. Our complete spray paint safety guide covers respirator selection, indoor ventilation setup, and safe practices for exactly this kind of small-scale indoor project.
Frequently Asked Questions
Does spray paint stick to glass without primer?
It can, especially with a paint labeled for glass or multi-surface use, but adhesion and durability are noticeably better with light sanding and a bonding primer, particularly for pieces that will be handled regularly.
Can you spray paint the inside of a glass vase?
Yes, but it’s usually better to paint the outside instead. Painting the interior traps the paint against a surface that may hold water later, and any imperfections are harder to fix from inside a narrow opening.
How long does spray paint last on glass?
With proper prep, primer, and a sealant, a painted glass piece can hold up for several years of normal decorative use. Items that are washed frequently or handled heavily will show wear sooner than shelf decor.
Can you put painted glass in the dishwasher?
No. Dishwasher heat and detergent will break down even a well-cured, sealed paint finish. Hand wash painted glass only.
What’s the difference between frosted spray paint and etching cream?
Frosted spray paint sits on top of the glass as a coating and can be reversed by stripping it off. Etching cream chemically alters the glass surface itself, creating a permanent frosted effect. Frosted spray paint is the easier, more beginner-friendly option for most decor projects.
Do I need to sand glass before every single project?
It’s strongly recommended for anything that will be handled or washed regularly. For purely decorative pieces that will sit untouched, some painters skip sanding when using a paint specifically labeled for glass — but adhesion is noticeably more reliable with the extra step, and it only adds about ten minutes to a project.
Can you spray paint stained glass windows?
Technically yes for decorative accents, but true stained glass windows are usually better restored or repaired by a specialist, since spray paint won’t replicate the light transmission and color depth of genuine stained glass, and painting over antique or leaded glass can reduce its value.
Final Thoughts
Glass rewards patience more than almost any other surface on this site. Skip the sanding step or rush the cure time and you’ll be repainting the same vase in a month. Take the extra fifteen minutes to properly clean, texture, and prime, and a painted glass piece can genuinely last for years — which makes it one of the best return-on-effort projects in spray painting.
Start with something low-stakes — a thrift-store jar or an old bottle — before tackling a piece you actually care about. Glass technique has a short learning curve, and your second project will look noticeably better than your first.
Once you’ve got a few glass projects under your belt, the same prep principles — clean, texture, prime, thin coats, patient cure — transfer directly to other tricky non-porous surfaces on this site, ceramic and ceramic-glazed items included. The specific products change; the underlying logic of why paint sticks or doesn’t stays the same across nearly every surface you’ll ever spray paint.