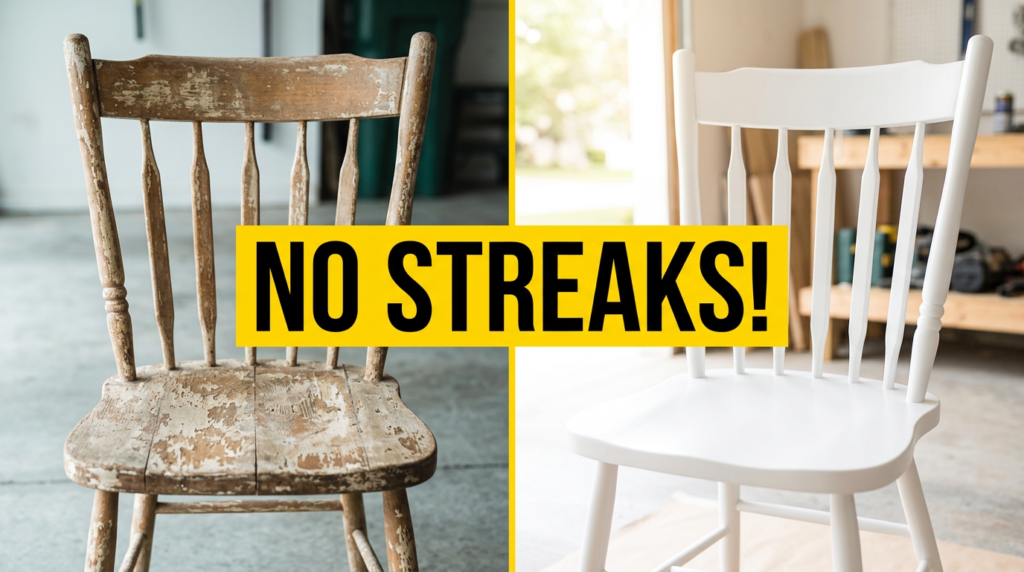
Spray painting furniture is one of the fastest, most affordable ways to refresh your home’s look—no contractor needed, no big budget required. But here’s the hard truth: most DIYers end up with streaks, drips, and blotchy finishes that look worse than what they started with.
If that sounds familiar, you’re not alone. The good news? A streak-free, professional-looking finish is 100% achievable at home—and it all comes down to technique, prep, and patience.
In this step-by-step guide, you’ll learn exactly how to spray paint furniture like a pro, avoid the most common mistakes, and get results you’ll actually be proud of.
Why Spray Painting Furniture Is Worth It
Before we dive in, here’s why spray paint beats a brush for furniture:
- Speed: You can transform a piece of furniture in hours, not days.
- Smooth finish: Spray paint delivers a factory-smooth result that brushes and rollers simply can’t match.
- Cost savings: Refreshing old furniture costs a fraction of buying new pieces.
- Versatility: Works on wood, metal, plastic, wicker, and more.
Already dealing with drips on a current project? Check out our guide on how to fix spray paint drips and runs before continuing.
Tools & Materials You’ll Need
Gather everything before you start—stopping mid-project ruins your flow and your finish.
| Item | Purpose |
|---|---|
| Spray paint (furniture-grade) | Main color coat |
| Primer | Helps paint bond and last longer |
| Sandpaper (220–400 grit) | Smooths the surface |
| Tack cloth | Removes fine dust after sanding |
| Painter’s tape | Protects edges and hardware |
| Drop cloth or newspapers | Protects your workspace |
| Safety mask, gloves, goggles | Protects you |
Pro Tip: Always use a furniture-specific spray paint. General-purpose cans may not adhere as well, especially on wood or previously painted surfaces. Not sure which type to use? Read our breakdown of acrylic vs. alkyd spray paint for furniture.
Step 1: Prep Your Furniture (Don’t Skip This)
Preparation is 70% of the result. Rushing this step is the #1 reason DIY spray paint jobs fail.
- Clean thoroughly — Remove all dust, grease, wax, or old polish with a degreaser or mild soap and water. Let it dry completely.
- Sand the surface — Use 220-grit sandpaper to smooth out scratches, rough spots, or old peeling paint. Sand with the grain on wood.
- Wipe off dust — Use a tack cloth (not a regular rag) to remove every particle of sanding dust.
- Tape off hardware — Cover hinges, knobs, or any area you don’t want painted.
✅ A clean, smooth surface = streak-free paint. No exceptions.
Step 2: Set Up a Proper Workspace
Where you paint matters just as much as how you paint.
- Work outdoors or in a well-ventilated garage — spray paint fumes are serious.
- Set furniture on sawhorses so you can reach all sides easily.
- Lay a drop cloth under and around the piece.
- Check the weather — avoid painting in direct sunlight, high humidity, or temperatures below 50°F or above 90°F. These conditions cause streaks, bubbles, and poor adhesion.
Dealing with bubbling paint from a past project? Our article on why spray paint bubbles and how to fix it covers every cause and solution.
Step 3: Prime the Furniture
Skipping primer is a shortcut that costs you later. Primer:
- Helps paint stick evenly to the surface
- Prevents blotchiness and tannin bleed-through (especially on bare wood)
- Makes your color coat look richer and last longer
How to prime:
- Shake the primer can for 60–90 seconds.
- Hold 10–12 inches from the surface.
- Apply a thin, even coat using smooth, sweeping strokes.
- Let it dry fully per the manufacturer’s instructions.
- Lightly sand with 320–400 grit sandpaper once dry.
- Wipe clean with your tack cloth.
Step 4: Apply Spray Paint Like a Pro
This is where technique makes all the difference.
The Golden Rules:
- Shake the can for at least 1–2 full minutes before spraying (and again if you stop for more than a minute).
- Hold 10–12 inches away from the surface—no closer.
- Move your entire arm, not just your wrist. Keep the can parallel to the surface at all times.
- Use horizontal or vertical passes, overlapping each stroke by about 30–50%.
- Apply multiple thin coats rather than one heavy coat. Thin coats = no drips, no streaks.
- Start and stop spraying off the surface — this prevents paint buildup at the edges.
Coat Schedule:
- Coat 1: Light dusting coat — just enough to tack the surface
- Coat 2 (10–15 min later): Full even coat
- Coat 3 (10–15 min later): Final coat if needed for full coverage
Beginner? Practice on a piece of cardboard first to get a feel for the spray pattern and hand speed. Our complete beginner’s guide to spray painting walks you through every foundational skill.
Step 5: Let It Dry Properly
- Follow the recoat time on the can label — usually 10–20 minutes between coats.
- Do not touch the surface to check if it’s dry. You’ll leave fingerprints.
- After the final coat, allow 24–48 hours for the paint to fully cure before using the furniture.
Patience here is the difference between a finish that looks great for years and one that chips in a week.
Step 6: Apply a Clear Topcoat (Optional but Recommended)
For furniture that takes daily wear—tables, chairs, dressers—a clear protective topcoat is worth it.
- Use a matte, satin, or gloss clear coat depending on your desired finish.
- Apply 1–2 thin coats, sanding lightly between them with 400-grit paper.
- Let cure fully before use.
A topcoat protects against scratches, moisture, and UV fading—especially important for pieces near windows or outdoors.
Common Spray Paint Mistakes to Avoid
| Mistake | What Happens | Fix |
|---|---|---|
| Spraying too close | Drips and runs | Stay 10–12 inches away |
| One thick coat | Streaks and sagging | Use 2–3 thin coats |
| Skipping sanding | Rough, peeling texture | Always sand before and between coats |
| Painting in humidity | Bubbling, slow drying | Paint in 40–70% humidity |
| Rushing drying time | Fingerprints and smudges | Let each coat fully dry |
| Not shaking the can | Uneven color, spitting | Shake 1–2 minutes |
Quick Tips for a Flawless Finish
- Rotate the furniture as you go — don’t reach awkwardly; move around it.
- Keep a consistent pace — uneven arm speed causes streaks.
- Work in sections on large pieces so you don’t lose your wet edge.
- Use painter’s tape for crisp lines on two-tone designs.
- Store your can upside down after use (spray to clear the nozzle) so it doesn’t clog.
Final Thoughts
Spray painting furniture isn’t hard — but it does reward those who take their time. Proper prep, the right tools, thin coats, and patience are the four pillars of a streak-free, professional-looking finish.
Follow every step in this guide, and you’ll end up with furniture that looks like it came straight from a high-end furniture store — without the price tag.
Have a specific project in mind? Whether you’re tackling a metal chair, a wooden dresser, or outdoor patio furniture, the fundamentals are the same. Now go get started.
Frequently Asked Questions
Can I spray paint over old paint? Yes — but sanding and priming are non-negotiable. Without them, the new paint won’t bond and will peel within weeks.
How many coats does it take? Two to three thin coats is the sweet spot for most projects. One thick coat is almost always a mistake.
What’s the best spray paint for furniture? It depends on the surface and look you want. For wood, acrylic or chalk-finish spray paints work great. For metal, enamel is more durable. See our HVLP vs Airless sprayer comparison if you’re considering a sprayer gun for bigger jobs.
Can a total beginner get professional results? Absolutely — if you follow the steps. The biggest beginner mistakes are rushing prep and applying paint too heavily. Slow down and you’ll be amazed at the results.
Do I need a clear coat? Not always, but highly recommended for high-use furniture. It protects the finish and extends the life of your paint job significantly.