The Correct Way to Spray Paint PP Plastic Prep
If you’re trying to refresh trending charcuterie board accessories like plastic mini bowls, label holders, utensil handles, risers, tongs, or decorative stands and your paint keeps peeling, scratching, or “rubberizing”, it’s not because you’re bad at DIY.
It’s because you’re probably painting polypropylene (PP)… the most stubborn common plastic to paint.
This guide is built specifically for beginners who want a finish that doesn’t fail. You’ll learn how to spray paint polypropylene plastic prep the right way (the exact steps that matter), which products are actually required, and what to avoid so you don’t waste paint, time, or money.
Why PP Plastic Is Hard to Paint
Polypropylene is famous for being low surface energy meaning coatings and adhesives tend to bead up rather than “wet out” and bond. This is the same reason many adhesives struggle to bond to low surface energy plastics unless the surface is modified or a special promoter is used.
The three main reasons paint fails on polypropylene
1) PP is naturally “non-stick.”
Regular paint wants to bond to surfaces with higher surface energy. PP fights that.
2) Mold release agents and oils are common.
Many PP items (especially mass-produced kitchen/party accessories) carry mold release agents, oils, and residues that cause paint defects and weak adhesion. Bulldog’s tech documentation specifically calls out mold release agents and wax/grease contamination as problems that must be removed before coating.
3) Smooth PP has no “tooth.”
Even if you clean perfectly, paint can still peel if the surface is glossy and unscuffed.
Bottom line:
If you skip either thorough cleaning + scuffing + adhesion promoter, paint failure is likely especially on small handled items like trending charcuterie board accessories (tongs, label clips, mini serving tools) that get touched constantly.
How to Identify Polypropylene
Before you buy products, confirm you’re working with PP. Good news: most PP items are easy to identify if you know where to look.
Check the resin code stamp (fastest method)
Flip the item over and look for the recycling triangle with a number:
- #5 = PP (polypropylene)
- You may also see “PP” stamped near the symbol.
Resin identification codes (RICs) are used to identify the type of plastic resin in an item and the number 5 corresponds to polypropylene.
Use “PP clues” when there’s no stamp
If there’s no resin code, PP often has these traits:
- Slightly waxy / slick feel
- Common in food containers, caps, kitchenware, and lightweight accessories
- Flexes a bit before snapping (varies by part thickness)
If you’re unsure: treat it like PP anyway
If it feels slick and paint has peeled before, follow this exact PP process. It’s better to over-prep than repaint twice.
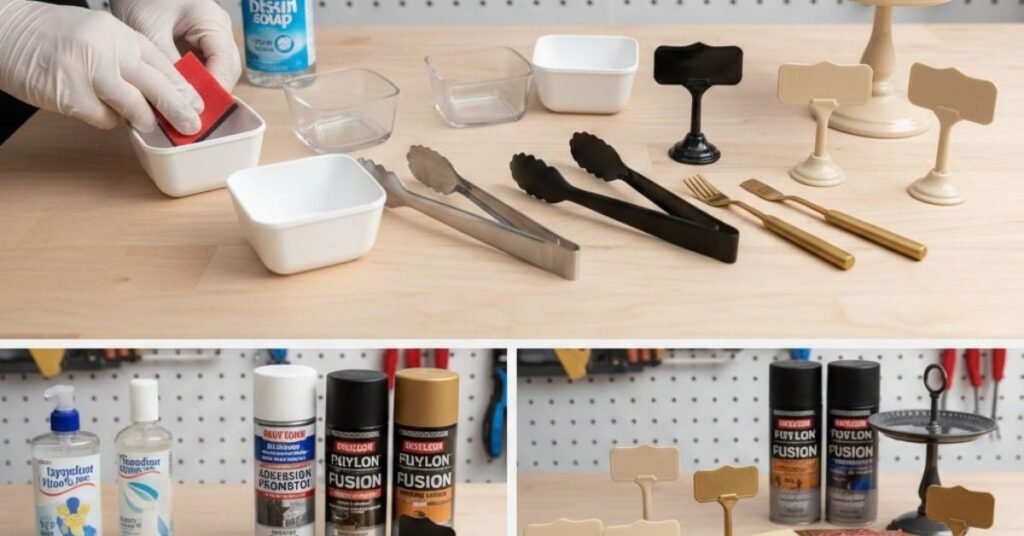
Required Products for PP Plastic
To avoid paint failure on polypropylene, you’re building a “bonding system,” not just spraying color. These are the core products that consistently make the difference.
1) Adhesion promoter
An adhesion promoter is designed to help coatings stick to polyolefin surfaces (polyolefins include PP and similar plastics). Rust-Oleum describes its Automotive Adhesion Promoter as a fast-drying clear primer that helps paint adhere to polyolefin surfaces such as automotive plastics, vinyl, trim, etc.
Other reputable options exist too. For example, SEM states its Plastic Adhesion Promoter increases adhesion to a variety of raw plastics and is excellent on olefin-based plastics.
2) Plastic primer
A dedicated plastic primer helps create a consistent base and can improve adhesion when paired with a promoter. Rust-Oleum’s Specialty Plastic Primer is designed to prepare plastics including polypropylene to be topcoated.
3) Scuff pads
For PP, scuffing is non-negotiable. Scuff pads are beginner-friendly because they conform to curves and reduce deep scratch lines.
Step-by-Step Prep Process
This is the core of how to spray paint polypropylene plastic prep so the paint doesn’t peel. Follow it in order. Don’t “optimize” it by skipping steps.
Step 1: Decide what you should paint
If you’re painting trending charcuterie board accessories, focus on:
Safe-to-paint (non-food-contact) areas
- Handles (tongs, spreaders, mini utensils)
- Decorative risers/stands
- Label holders (outside surfaces)
- Tray feet, decorative bases
Avoid painting (food-contact areas)
- Interior of bowls/ramekins
- Surfaces that touch moist/oily foods
- Cutting surfaces
Paint products vary widely and are often not intended for direct food contact. If you must paint something used near food, keep paint strictly on non-contact surfaces and allow full curing.
Step 2: Wash first (remove water-soluble grime)
- Warm water + dish soap
- Scrub thoroughly (especially around seams)
- Rinse completely
- Dry fully
Major point: PP often holds invisible residues. A “quick wipe” is not enough.
Step 3: Degrease second (remove oils + release agents)
Now wipe down with:
- 70–91% isopropyl alcohol or
- a dedicated degreaser
Bulldog’s technical information highlights removing wax, grease, and mold release agents because they can cause finish problems.
Do this like a pro:
- Use a clean cloth side frequently
- Wipe in one direction
- Wear gloves afterward so you don’t re-add skin oils
Step 4: Scuff the surface (create tooth)
Use scuff pads (best for most accessories) or fine sandpaper (400–600 grit).
Your goal is a surface that looks:
- evenly dull
- uniformly scuffed
- no shiny patches
For detailed accessories:
Scuff pads are easier to control on textured PP and curves (common on trendy board accessories like mini tongs, clips, and label stands).
Step 5: Remove dust completely
Dust under paint = weak spots + texture.
- Wipe with a clean microfiber
- Optional: a tack cloth before spraying
A tack cloth is specifically designed to remove fine dust before painting/finishing.
Step 6: Apply adhesion promoter (this is the turning point)
This is where most “PP paint jobs” become durable.
Rust-Oleum positions its adhesion promoter as a fast-drying clear primer that helps paint adhere to polyolefin surfaces.
SEM also describes its promoter as sealing substrates and increasing adhesion, especially for olefin-based plastics.
Application tips (beginner-safe):
- Shake well
- Spray light, even coats
- Do not flood the surface
- Follow the label’s recoat window carefully (this matters a lot for bonding)
Major point:
If your promoter says “topcoat within X minutes,” treat that as a rule, not a suggestion.
Step 7: Plastic primer (optional but recommended for best results)
If you want the highest success rate especially for handled accessories apply a plastic primer after the promoter (as directed by the products you choose).
Rust-Oleum states its Specialty Plastic Primer is designed for plastics including polypropylene.
Why primer helps:
- Improves uniformity and coverage
- Reduces the number of color coats
- Helps avoid thin weak spots on edges and corners
Step 8: Color coats (light coats win)
Whether you’re matching a modern charcuterie theme (matte black, warm neutral, brushed-metal look) or repainting outdoor PP pieces, technique matters.
Best practice:
- 2–5 light coats (depending on color)
- Keep a consistent distance
- Overlap passes evenly
- Let each coat flash off (dry slightly) before the next
Major point:
Heavy coats are the fastest way to get runs, solvent trapping, and soft paint that scratches easily.
Step 9: Cure time (where durability is made)
Dry-to-touch is not cured.
Even paints marketed as high-adhesion may need significant cure time for chip resistance. Some technical sheets and product info commonly reference full cure timelines (often days). For example, a Krylon Fusion technical data sheet notes full chip resistance after a longer cure period (example: 7 days).
Practical rule for PP accessories:
- Wait at least 48–72 hours before light handling
- Wait longer before heavy use (especially tongs, clips, handled pieces)
If you want your painted trending charcuterie board accessories to survive repeated use, curing is non-negotiable.
Best Paint Systems for PP
Here are paint system approaches that consistently work on polypropylene, from easiest to most “bulletproof.”
System A: “Simplest that often works” (good for décor pieces)
- Clean + degrease
- Scuff pads
- Adhesion promoter
- High-adhesion spray paint
Krylon markets Fusion All-In-One as bonding strongly to difficult surfaces like plastics (product claim).
Best for:
Decor-only PP items that won’t be constantly handled.
System B: “Best all-around” (recommended for most PP projects)
- Clean + degrease
- Scuff pads
- Adhesion promoter
- Plastic primer
- Color coats
Rust-Oleum’s plastic primer is explicitly designed to prep plastics including PP for topcoating.
Best for:
Handle accessories, edges, small items, and anything you want to last.
System C: “Maximum adhesion” (for problem PP or repeat failures)
- Clean + degrease (extra thorough)
- Scuff pads (don’t skip corners)
- Adhesion promoter (strict recoat window)
- Plastic primer
- Quality topcoat
- Full cure time (days)
Best for:
PP that has failed before, slick/molded surfaces, or items exposed to wear.
What to Avoid
If you want to avoid peeling, chipping, or sticky finishes, avoid these common mistakes.
1) Skipping the adhesion promoter
PP is one of the plastics where promoter makes the difference between:
- “looks good for a week”
and - “still looks good months later”
Promoters are specifically designed to help coatings adhere to polyolefin plastics like PP.
2) Painting without scuffing
Even “no sanding required” claims don’t mean scuffing can’t help. For PP accessories that are handled a lot, scuffing is cheap insurance.
3) Using heavy coats
Heavy coats:
- run easily
- stay soft longer
- chip more at edges
- fail faster when handled
4) Touching the surface after degreasing
Skin oils are enough to reduce adhesion on PP. Wear gloves.
5) Spraying in poor conditions
Avoid:
- cold temperatures
- very high humidity
- dusty areas with floating lint
Dust becomes texture and weak points.
6) Rushing cure time
If you paint today and assemble a board tomorrow, don’t be surprised if clips and tongs scratch quickly. Give it time.
Quick “PP Prep That Works” Checklist
Use this as your final pass before you spray:
- Confirm #5 PP stamp or treat as PP
- Wash thoroughly, rinse fully, dry completely
- Degrease (remove oils + release agents)
- Scuff evenly (no shiny spots)
- Remove dust (microfiber / tack cloth)
- Apply adhesion promoter (follow recoat window)
- Apply plastic primer if you want maximum durability
- Spray light coats
- Let it cure fully (days is better for handled items)
FAQ
Can you spray paint polypropylene without primer?
Sometimes but it’s less reliable. For PP, the most consistent approach is scuff + adhesion promoter, and a plastic primer improves durability further. Products like Rust-Oleum’s plastic primer are specifically designed to prep PP for topcoating.
What’s the difference between adhesion promoter and plastic primer?
- Adhesion promoter: helps paint chemically “grab” low-energy plastics like PP (polyolefins).
- Plastic primer: builds a more uniform base for color coats and can improve overall durability/coverage on plastics including PP.
Do I need to sand PP or are scuff pads enough?
Scuff pads are usually enough for accessories and curved shapes especially for trending charcuterie board accessories where the parts are small and detailed. Sandpaper can be better for flat glossy surfaces, but scuff pads are the easiest beginner option.
Why does my paint feel sticky on polypropylene?
Usually one of these:
- coats were too heavy (solvent trapped)
- sprayed in high humidity/cold
- not cured long enough
- incompatible layers (primer/topcoat mismatch)
Fix: let it cure longer; for future projects, use lighter coats and follow recoat windows.
What paint works best for polypropylene?
Look for paint systems designed for plastics and use adhesion promoters for reliability. Krylon Fusion All-In-One as bonding strongly to plastics (product claim).
For the most dependable results on PP: promoter + plastic primer + quality topcoat.
Can I paint plastic charcuterie accessories safely?
Paint is generally safest when kept to non-food-contact surfaces only (handles, bases, decorative parts). Avoid painting surfaces that touch moist/oily foods. Always let paint fully cure before use.
Final Thoughts
Polypropylene isn’t “unpaintable” , it’s just unforgiving. If you follow the correct way to spray paint polypropylene plastic prep process cleaning, scuffing, dust control, adhesion promoter, and patient curing you can get a finish that holds up even on frequently handled items.