Unlocking the Art of Precision: How to Paint Champagne Bottles
Do you enjoy late-night parties? Or, on weekends, do you enjoy movies late at night? Your friend has been promoted. Won’t you think about congratulating them? Or, on any celebration, what idea first comes to our mind is to present a champagne bottle. Without it, any party looks like a vegetable. So, you must have Champagne bottles at your place if you have ever been gifted with it or you are a party person. What are you thinking? Why am I writing about Champagne bottles? Actually, my brainstorming is about something other than champagne bottles. I am writing about painting the bottle you have decided to give someone so special to celebrate. Have you ever thought of decorating your living room with painted bottles? Imagine, beside your couches, there’s a wooden tray. And, on it, a line of painted bottles is kept. Isn’t it beautiful? Or, on your wall, a hand-painted bottle wall mate is hanging. Isn’t it creative?
Yes, I am talking about painting Champagne bottles. Now, the question is how to paint champagne bottles. Don’t worry. This guide will help you with every pinch of ideas to paint your champagne bottle. As a beginner, you may need some help. How to hold the bottle, what colors should be applied, or what kind of paint suits the most. Relax! Over time, you will learn everything, and you will be skilled to give a perfect look to the process. Painting champagne bottles is a perfect and unique way to celebrate your special days. Actually, it’s the best thing to add some bubbles to the occasion. Life is too short to regret. Learn to enjoy every little moment of your life. Now, let’s dive into the article to learn how to paint champagne bottles. Bottle recycling or decorations are undoubtedly a beautiful art. We can make our day special by doing such creative things. But colors rarely stick to bottle ground because of their shape. To paint a champagne bottle perfectly, you have to know the procedures to paint your bottle beautifully. So, stay with the article to learn how to paint champagne bottles.
Pieces of Stuff You Will Need How to Paint Champagne Bottles:
- Champagne Bottle Obviously. You have options to pick your favorite one.
- To Paint: Acrylic paint will be the best pick
- Make Sure That You Have A Collection Of Good Quality Paint Brushes
- Hope You Have Heard About The Taps Which are Specially Used To Paint. Gather, Those Painters Tape
Are you already tired? Then, take a sip of your favorite champagne and then again sit to read.
Most Important 6 Step – How to Paint Champagne Bottles ?
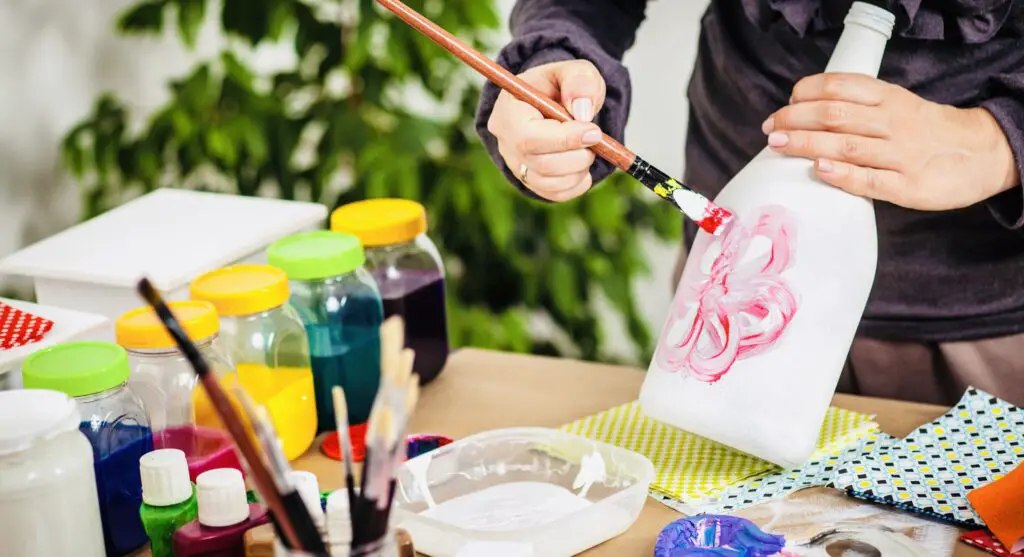
Step 1: Cleaning & Taping
First move tape off the labels from your bottles. Why? Because you need a clean ground to paint. You need to tap off the labels to get a clear line to paint. Wait. Take time to make it creative. Play with the ideas you have in your mind. Make your painting unique, memorable, and precious.
Once you are done with the taping off labels, clean the bottles with lukewarm water to make them dust-free. Remember, the ground with dust particles will spoil your paint, and the paint won’t last.
STEP 2: Painting the Background Of Bottles
On note, to paint on something, always start with a clean and white background. Take a little amount of paint, actually acrylic paint. Then, brush it all over the background. The first touch won’t be so smooth, but don’t worry. It happens.
Make three or four layers of background with white color. That will make the paint thick, and you will get a good coat. Give time to dry the coats. Once the coat is dry, your bottle is ready to float in a colorful ocean. A dry background is perfect for getting perfect coverage.
STEP 3: Time To Give A Stroke of Your Thoughts
Before you go for a final stroke, it will be better if you sketch your design on paper. Usually, painting is a way to express your imagination with colors. If you do it on paper as your first attempt, then on your bottle background, it will come out in a better way.
Then, make sure you have all the required elements together so that you will be able to start over quickly. Then, whatever your imagination is, please give it a visualization with a pencil on the champagne bottle. Make sure the pencil sketch turns out clearly on the white-coated background. You are almost on the way to cheer up!
Step 4: Time To Paint In Pain Detail
Previously, you were done with your pencil sketch. Now, it’s time to paint in detail. Once your plan is sketched out, it’s time to paint in all the details.
If you have read the stuff needed to paint, you must have an idea of what paint you should use to paint your champagne bottles. It’s acrylic. Make sure that you have perfectly sized and aluminized brushes to paint.
STEP 5: Layering the Elements to Make Them Deep
Layering the elements gives a perfect depth to your bottle’s design. Never make a floral design without painting the basics. Paint the significant elements in the first stroke, then make some floral designs. You can search on Google for some beautiful designs for your bottles. Then try to match them with your Champagne bottles. The outcome depends on the stroke of your brush paint.
Now, allow me to share a secret. If you have ever messed up with the paintings, you can cover it up by mixing colors. You don’t need to pressurize your tiny head to have a perfect outlook. The colors are always good. However, if your brush paints are suitable, then the outcome will always be gorgeous.
STEP 6: Lettering on The Paint
Finally, you are done with the painting. Now, it’s time to go for the final touch. Whenever we gift someone with something beautiful, we love to wish them with a short note or a letter. But you can make it unique by expressing your good wishes if you write something on the painted champagne bottle. So, start lettering on your newly painted bottle.
If you are not introduced to a brush letter, then go for understandable handwriting. Look on Google for some unique fonts to match them with your celebration. Then start playing. Remember to remove the labels from the bottle.
FAQ
What kind of paint is perfect for champagne bottles?
Acrylic paint, undoubtedly. But if you have less time, then you can use spray paint to make a background. And then decorate the bottle with letters.
How to paint a champagne bottle for a gift?
Use white spray paint on the bottle’s body. Then, make some paper crafts like hearts, butterflies, roses, anything you can. Then, glue the paper pieces on the colored bottle. That’s it. Your Champagne bottle is ready to be gifted on any wedding birthday or to give your holidays a unique look.
What to Do To Make The Paints Last Longer on a Champagne Bottle
Since you have worked hard to paint your champagne bottle, you don’t want to vanish the paint. So, what to do to make the paints last longer on a champagne bottle?
- Make sure your bottle is neat and clean
- Let your bottle dry ideally once you are done with painting
- Don’t go for emulsion or oil paint. Instead, make it with spray or acrylic paints
Final Words
If you love to design, then painting bottles is a beautiful idea to decorate your gifts without wrapping them. But remember, all kinds of paints don’t stick to a champagne bottle. So, you have to gather precise and transparent knowledge about how to paint champagne bottles.
This article will give you the perfect vibe of confidence to paint your colourful thoughts on your champagne bottle.
Enjoy the colors!