Applying the Best Primer for Plastic Spray Paint: A Step-by-Step Guide
Plastic is one of the most frustrating surfaces to spray paint because not all plastics accept paint the same way. You can do everything “right,” get a smooth finish, and still watch the paint scratch off, chip, or peel later. In most cases, that failure isn’t because the paint is “bad.” It’s because plastic often needs a bonding system, not just color.
That’s where a plastic-rated primer (and sometimes an adhesion promoter) becomes the difference between:
- a finish that looks good for a weekend, and
- a finish that still holds up months later.
This guide is built from manufacturer technical documentation and application guidance (not personal testing). You’ll learn why plastic needs special primer, when you should use adhesion promoters too, which primers are the most dependable, and exactly how to prime plastic so your topcoat doesn’t peel.
Why Plastic Needs a Special Primer
Plastic is not one material. It’s a category: ABS, PVC, polypropylene (PP), TPO, polystyrene, resin, fiberglass-reinforced plastics, vinyl, and more. Some are relatively paint-friendly. Others are not.
The real issue: “paint can’t grab”
Many plastics (especially olefin-based plastics like PP/TPO) have low surface energy, meaning coatings don’t wet-out and bond as easily as they do on wood or metal. That’s why plastic can still behave “slippery” even after you clean it.
A plastic primer is formulated to:
- improve adhesion on plastics,
- create a uniform base so topcoats lay evenly,
- and in many cases provide light filling/surfacing so the finish looks smoother.
Manufacturers also describe plastic primers in ways that match these goals:
- Rust-Oleum’s Specialty Plastic Primer Spray is designed to prepare plastic surfaces to be top coated, and lists suitable plastics like polypropylene, polystyrene, resin, PVC, fiberglass, and vinyl plastics.
- SEM’s Plastic Primer is described as a water-based, flexible surface designed for automotive plastic refinishing, with features like fast filling, outstanding adhesion, and easy sanding/featheredge.
The hidden cause of peeling: contamination + smoothness
Plastic often carries contamination you can’t see:
- mold release agents (from manufacturing),
- oils from hands,
- silicone residue (interior dressings, tire shine),
- waxy residues from outdoor exposure.
Even if the plastic looks clean, these residues can prevent true bonding. That’s why a plastic-safe cleaning step and a light scuff are usually part of every successful system.
Primer vs Adhesion Promoter
This is where most people get confused, so let’s simplify it. A primer prepares the surface for paint, while an adhesion promoter helps paint stick to difficult plastics. They serve different purposes and often work best when used together.
What primer does
A primer is a base coat designed to:
- improve adhesion and coverage,
- create a uniform surface,
- and (depending on the primer) fill tiny imperfections and sand smooth.
Plastic primers are often formulated to stay slightly flexible, because plastics flex and expand/contract more than metal.
What adhesion promoter does
An adhesion promoter is a bonding tie-coat that’s especially important for plastics that are notoriously hard to paint—most commonly olefin-based plastics (PP/TPO).
SEM’s Plastic Primer TDS is very direct about this point: it lists “properly prepped raw plastic” as a suitable substrate, but adds a note that olefin-based plastics require the use of adhesion promoter prior to priming.
That one line is a big clue: on some plastics, primer alone is not enough.
A simple decision rule (works for most projects)
Use primer only (often enough) when:
- the plastic is ABS/PVC and scuffs easily,
- the part is mostly decorative (light handling),
- you’re using a paint system designed for plastics.
Use adhesion promoter + primer (best for durability) when:
- the plastic is PP/TPO/polyolefin, or you’re not sure what it is,
- the item will be handled, bumped, flexed, or used outdoors,
- you’ve had peeling issues before.
What about “no primer needed” paints?
Some paints are marketed as bonding strongly to plastics without sanding/priming. Krylon Fusion All-In-One, for example, is described as bonding with stronger adhesion to difficult surfaces like plastics and claims “no sanding or priming.”
Those products can work well for the right situation, but if your goal is maximum durability, especially on unknown plastic or outdoor/handled items, a proper prep + primer system is still the most dependable approach.
The most reliable setup for “no peeling”
If you want the best odds of long-term success on difficult plastics, the most reliable stack is:
Clean → Scuff → (Adhesion promoter if PP/TPO/unknown) → Plastic primer → Topcoat → Clear (optional)
That’s not about “more layers.” It’s about building a system that bonds properly.
Best Plastic Spray Paint Primers
Below are the most dependable primer options based on published manufacturer documentation. Instead of listing dozens of products, this focuses on the ones with clear plastic suitability and practical guidance.
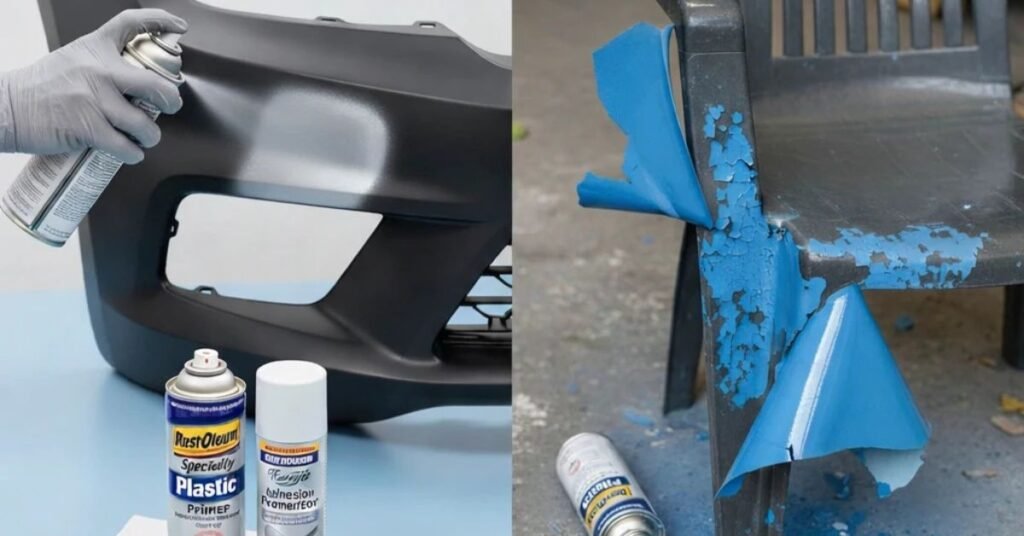
1) Rust-Oleum Specialty Plastic Primer Spray (SPC-26)
Rust-Oleum’s TDS states this product is designed to prepare plastic to be top coated and lists plastics like polypropylene, polystyrene, resin, PVC, fiberglass, and vinyl plastics.
It also includes practical, project-useful guidance:
- For best adhesion, apply one thin coat rather than a heavy coat or multiple coats.
- Dry/recoat times are clearly stated (touch dry ~20–30 minutes, handle ~1 hour, fully dry ~24 hours), and it notes when oil-based vs latex topcoats should be applied.
Best use cases
- General DIY plastic projects
- Outdoor plastic furniture (with proper prep)
- Any project where you want an easy aerosol plastic primer with documented timing
When to add adhesion promoter
If the plastic is polyolefin/unknown and you’ve had peel issues, use a promoter first for extra bonding insurance (especially for high-contact parts).
2) SEM Plastic Primer (4P-15-034) — flexible surfacer for plastic refinishing
SEM describes its Plastic Primer as a water-based, flexible surfacer designed for automotive plastic refinishing.
Key points in the TDS that matter in real projects:
- It’s designed to be sanded and feathered (“easy to sand and feathered”).
- It provides flash time guidance (5–10 minutes between coats) and a time-to-sand window.
- Most importantly: olefin-based plastics require the use of adhesion promoter prior to priming.
Best use cases
- Automotive plastic trim and parts
- Jobs where you want a surfacer you can sand smooth
- Projects where flexibility matters (plastic parts that flex)
Note
This is more “refinish workflow” than casual aerosol DIY. It shines when you’re building a smooth base and want a controlled, professional process.
3) Dupli-Color Plastic Primer (hard plastics) documented for multiple plastic types
A Dupli-Color plastic primer technical info document describes it as a bonding product for painting plastic parts and lists compatibility with several hard plastics (such as ABS, hard PVC, and others).
Best use cases
- Hard plastic items that are paintable
- Projects where you want a plastic primer documented for multiple plastic types
When to be cautious
With plastic, “hard plastic” still varies a lot. If your project is PP/TPO/polyolefin, an adhesion promoter step is often the safer route.
4) “All-in-one bonding paint” alternative (when you want fewer steps)
If your main goal is convenience and your project isn’t extreme abuse, paints like Krylon Fusion All-In-One are marketed as bonding to plastics without sanding or priming.
Best use cases
- Light-duty plastic décor items
- Quick refresh projects
- Situations where you want fewer steps and accept slightly higher risk on difficult plastics
If you’re painting outdoor furniture, bumpers, trim, or anything that gets handled constantly, a full prep + primer system remains the safer bet.
Step-by-Step Plastic Priming Guide
This section is written to be repeatable. Follow it and your odds of peeling drop dramatically.
1) Identify the plastic when possible
Look for a stamp on the backside of the part:
- PP / TPO / PO → polyolefin (hardest to paint)
- ABS → usually easier
- PVC → moderate
If you can’t identify it, treat it as potentially difficult and plan your system accordingly (especially if the item is outdoors or handled often).
2) Clean in two stages (this matters more than people think)
- Stage 1: Soap + water wash to remove dirt, mud, and water-soluble grime.
- Stage 2: Degrease to remove oils, silicone residue, and “invisible” contamination.
If you skip the wash and go straight to degreaser, you can smear dirt into the surface and create bonding problems.
3) Scuff for uniform dullness
Your goal is not deep scratches. Your goal is uniform dull with no glossy spots.
- Use a scuff pad or fine abrasive
- Avoid aggressive sanding that gouges plastic
- Don’t polish the surface smooth again
Glossy spots are common failure points because coatings bond weakest there.
4) Apply adhesion promoter (only if needed)
If your plastic is PP/TPO/polyolefin—or you’re unsure and want maximum durability—apply an adhesion promoter before primer.
SEM’s own Plastic Primer documentation states olefin-based plastics require adhesion promoter prior to priming.
This is the most common missing step in plastic paint failures.
5) Apply plastic primer correctly (thin, controlled coats)
For Rust-Oleum’s plastic primer spray, the TDS emphasizes applying one thin coat for best adhesion rather than a heavy coat or multiple coats.
For SEM Plastic Primer, the TDS describes applying two medium-wet coats with 5–10 minutes flash time between coats.
The takeaway: follow the primer’s intended film build. Too heavy can cause issues; too light can lead to weak coverage.
6) Sand only if the system is meant to be sanded
Some plastic primers are designed as surfacers you can sand smooth (SEM’s product explicitly notes sanding and featheredge).
If you’re chasing a smooth, professional finish:
- Let the primer dry properly
- Sand lightly to smooth texture
- Remove dust thoroughly before topcoat
If your primer is “bonding only” and not meant to be sanded heavily, keep sanding minimal.
7) Topcoat within the correct window
Timing matters more than brand. Use the product’s recoat guidance.
Rust-Oleum’s plastic primer TDS provides specific timing for topcoats:
- touch dry 20–30 minutes, handle 1 hour, fully dry 24 hours
- oil-based finish coat after 1 hour
- latex topcoat after 4 hours
- maximum adhesion achieved in 5–7 days
That last line is important: “dry” isn’t the same as “fully bonded.” Give the coating system time to reach full strength.
Dry Time & Recoat Tips
If you want a finish that doesn’t peel later, treat dry time and recoat windows as part of the system not as optional advice.
What “dry to touch” really means
“Dry to touch” means the surface is no longer tacky. It does not mean:
- fully cured,
- fully bonded,
- ready for heavy use.
Rust-Oleum’s primer documentation explicitly notes that maximum adhesion is achieved in 5–7 days, which reinforces that full bond strength takes time.
Don’t rush the next coat
Top coating too soon can trap solvents. Top coating too late can reduce bonding in some systems. Follow the label/TDS.
SEM Plastic Primer provides flash time guidance (5–10 minutes between coats) and a time-to-sand window (45 minutes).
Temperature and humidity matter
Rust-Oleum’s plastic primer documentation recommends using it when temperature is 50–90°F and humidity is below 85% for proper drying.
Cold temps and high humidity slow evaporation and can weaken early bonding.
A practical “durability schedule”
If your project is outdoors or handled frequently:
- Prime and paint in good conditions
- Let it sit at least overnight before light handling (better: 24 hours)
- Avoid heavy use for several days if possible (especially if the product states maximum adhesion takes days)
Final Verdict
Plastic needs a different approach than wood or metal. The most consistent results come from building a system:
- Remove contamination thoroughly
- Scuff for uniform tooth
- Use adhesion promoter on PP/TPO/unknown plastics (especially for durability)
- Use a plastic-rated primer with documented compatibility and timing
- Respect dry and recoat windows—because full adhesion takes time
Quick picks (most useful way to think about it)
- If you want an easy aerosol plastic primer with clear dry/recoat guidance: Rust-Oleum Specialty Plastic Primer Spray
- If you’re aiming for a refinishing-style base you can sand smooth: SEM Plastic Primer (flexible surfacer)
- If your plastic is PP/TPO (or unknown) and you want the best odds against peeling: use adhesion promoter before primer (SEM explicitly requires this for olefin-based plastics).
A reliable “two-product” approach for difficult plastics
For the hardest plastics (PP/TPO/unknown), the most dependable setup is:
- Adhesion promoter first
- then a plastic primer designed for your project type
That combination is what prevents the classic failure: primer and paint that look good initially, then lift later.