Spray painting is one of the fastest and most effective ways to achieve a smooth, professional-looking finish on almost any surface—metal, wood, plastic, or even DIY crafts. But if you’ve ever ended up with unsightly drips or runs, you know how quickly a project can go from perfect to frustrating.
The good news is that spray paint drips and runs are not permanent mistakes. With the right approach, you can fix them and restore a flawless finish.
In this complete guide, you’ll learn why drips happen, how to fix them step by step, and how to prevent them in the future like a pro.
🔍 What Are Spray Paint Drips and Runs?
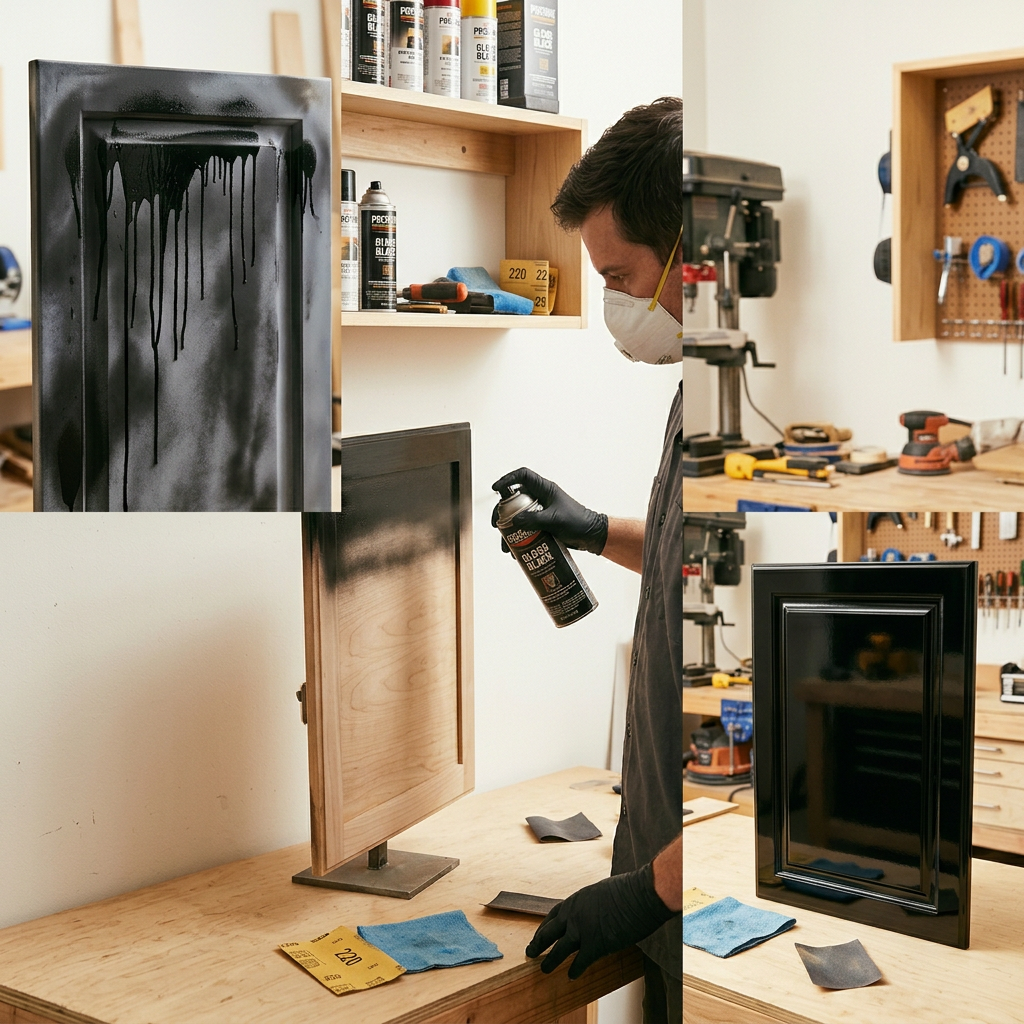
Drips and runs occur when excess paint builds up on a surface and begins to flow downward before it has time to dry.
Drips: Small droplets of paint that form and hang
Runs: Longer streaks where paint flows downward
Both issues are caused by too much wet paint sitting in one area.
⚠️ Main Causes of Spray Paint Drips
Understanding the root cause will help you avoid repeating the same mistake.
1. Applying Too Much Paint
This is the most common reason. A heavy coat overwhelms the surface and gravity takes over.
2. Spraying Too Close
Holding the spray can closer than 6–8 inches concentrates too much paint in one spot.
3. Moving Too Slowly
If your hand moves slowly, paint builds up instead of spreading evenly.
4. Poor Surface Preparation
Dust, grease, or uneven surfaces prevent proper paint adhesion.
5. Environmental Conditions
High humidity slows drying
Heat can cause uneven application
Lack of airflow affects curing
🛠 How to Fix Spray Paint Drips and Runs (Step-by-Step)
Follow this proven method to repair your surface without ruining the entire project.
Step 1: Let the Paint Fully Cure
This step requires patience, but it’s critical.
Do not touch or fix the paint while it’s wet
Wait at least 24 hours, or longer in humid conditions
👉 Trying to fix wet paint will smear it and make the damage worse.
✅ Step 2: Inspect the Damaged Area
Once dry, check the severity:
Light drips → easy to sand
Heavy runs → may need more sanding and repainting
👉 Good lighting helps you see imperfections clearly.
✅ Step 3: Sand the Drips Smooth
Now it’s time to level the surface:
What you need:
220–400 grit sandpaper
Sanding block (recommended)
How to do it:
Sand gently over the drip
Focus only on the raised area
Stop once the surface feels smooth
👉 Don’t oversand—you don’t want to remove too much paint.
✅ Step 4: Clean the Surface Properly
After sanding:
Use a tack cloth or microfiber cloth
Remove all dust and debris
Make sure the surface is dry and clean
👉 Any leftover dust will ruin your next coat.
✅ Step 5: Reapply Spray Paint Correctly
Now you’re ready to repaint the area:
Best technique:
Hold the can 8–12 inches away
Use light, even coats
Spray in a side-to-side motion
Overlap each pass by about 50%
👉 Start spraying before the object and release after passing it.
✅ Step 6: Apply Multiple Thin Coats
Instead of one heavy coat:
Apply 2–4 thin layers
Wait 10–30 minutes between coats (check label)
👉 Thin coats dry faster and prevent future drips.
💡 Pro Tips for a Perfect Spray Paint Finish
If you want results that look professionally done, follow these expert tips:
✔ Keep a Consistent Distance
Always maintain the same distance from the surface while spraying.
✔ Control Your Speed
Move your hand steadily—not too fast, not too slow.
✔ Shake the Can Properly
Shake for at least 1–2 minutes before use.
✔ Test Before You Spray
Always test on cardboard or scrap material first.
✔ Work in the Right Environment
Ideal temperature: 65–85°F (18–29°C)
Low humidity
Good ventilation
🚫 Common Mistakes (And How to Avoid Them)
❌ Mistake: One Thick Coat
✔ Fix: Always use multiple thin coats
❌ Mistake: Spraying Too Close
✔ Fix: Maintain 8–12 inches distance
❌ Mistake: Stopping Mid-Surface
✔ Fix: Use continuous motion across the object
❌ Mistake: Ignoring Dry Time
✔ Fix: Follow recoat instructions on the can
🧪 Advanced Fix: Wet Sanding for Professional Results
For high-end projects (like cars or furniture), you can use wet sanding:
Use 600–1000 grit sandpaper
Dip in water while sanding
Creates an ultra-smooth finish
👉 This technique is great for achieving a factory-like result.
🛡 How to Prevent Drips and Runs in the Future
Prevention is always better than fixing mistakes.
Key Rules:
Apply thin coats only
Keep the spray can moving
Maintain proper distance
Prepare the surface properly
Avoid painting in bad weather
👉 Remember: Control is more important than speed
Spray paint drips and runs can be frustrating, but they’re also one of the easiest problems to fix once you know the right process.
The key steps are simple:
Be patient and let the paint dry
Sand carefully to smooth the surface
Reapply using thin, controlled coats
With a little practice and attention to technique, you can achieve a clean, smooth, and professional finish every time.