Master the Foundation: Essential Prep for a Flawless Finish
If you’ve ever spray-painted a “quick little upgrade” and watched the paint flake off in sheets a week later… You already know the truth: plastic is picky.
And right now, with trending charcuterie board accessories exploding on social (mini bowls, labels, tongs, serving tools, risers, etc.), a lot of people are trying to refresh cheap plastic pieces to match their “aesthetic” boards only to end up with peeling, sticky, or chipped finishes.
This guide shows you how to prep plastic for spray paint without peeling step-by-step, beginner-safe, and focused on the prep choices that actually control adhesion.
Why Spray Paint Peels Off Plastic
Paint peeling on plastic almost always comes down to one (or more) of these issues:
1) Plastic is naturally low-energy (paint can’t “grab”)
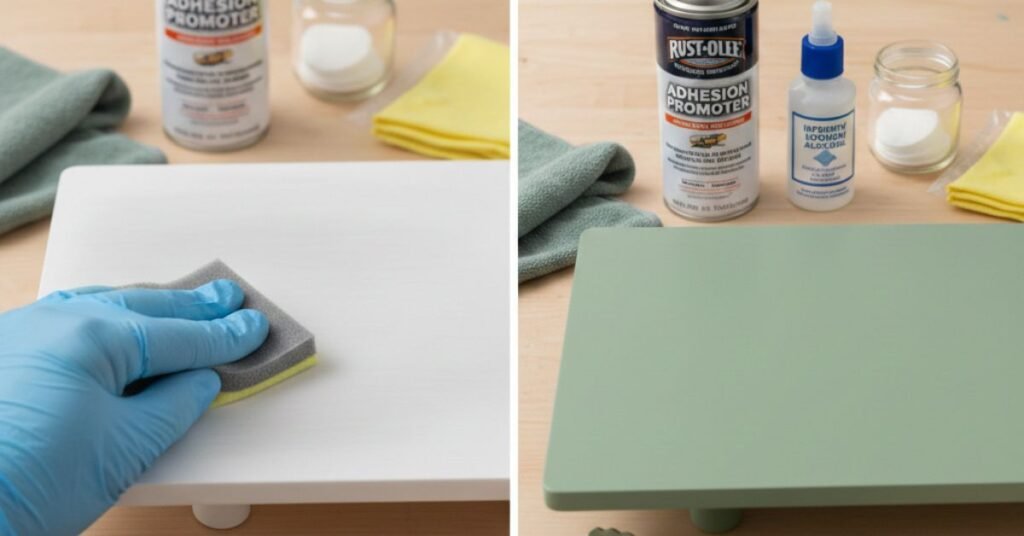
Many plastics, especially polyolefins like polypropylene (PP) , have surfaces that are naturally resistant to bonding. Without the right prep and/or an adhesion promoter, paint sits on top like a “skin” instead of chemically anchoring. Products like Rust-Oleum’s adhesion promoter are specifically marketed to help coatings stick to polyolefin plastics and similar hard-to-bond surfaces.
2) Oils, silicone, and “invisible grime” block adhesion
Kitchen plastics and party accessories (hello, trending charcuterie board accessories) are often coated with:
- skin oils
- cooking grease aerosols
- dish soap residue
- silicone-based cleaners
- packaging release agents
If you paint over that film, you’re basically painting over a lubricant.
3) The surface is too smooth (no tooth)
Even when the plastic type can be painted, a glossy surface gives paint almost nothing to bite into. Light sanding/scuffing creates mechanical grip especially important for items that get handled a lot (tongs, label holders, mini utensil handles).
4) Wrong primer (or no primer) for the plastic type
“Primer” isn’t one-size-fits-all on plastic. An adhesion promoter is different from a general primer: it’s designed as a tie-coat to improve bonding on plastics and synthetics. Bulldog, for example, is marketed to promote adhesion on many automotive plastics and other synthetics.
5) Rushing dry time (dry ≠ cured)
Paint can feel dry in 20 minutes but still be soft underneath. Handling too early is a fast track to fingerprints, chips, and peeling edges later especially on flexible plastics.
Plastic Identification (ABS, PP, PVC)
Before you scuff anything, identify what you’re painting. Your prep method depends heavily on whether the surface is friendly or stubborn.
Step 1: Look for markings or resin codes
Many plastics have a stamp on the underside with a recycling symbol and number. These resin identification codes help you understand the plastic family.
Common ones you’ll run into:
- #5 PP (Polypropylene): very common in cheap kitchenware and serving accessories; notoriously hard to paint without a promoter.
- #3 PVC (Polyvinyl chloride): often in pipes/trim and some rigid parts; usually paintable with correct prep.
- ABS: often used in housings and rigid parts; usually takes paint better than PP.
ABS doesn’t always show up neatly as a resin code. Sometimes it’s stamped “ABS” directly.
Step 2: Use the “where is this used?” clue
- PP (#5) is common for flexible, slightly waxy-feeling items (many budget bowls, clip-on pieces, some utensil parts).
- PVC (#3) shows up in rigid, pipe-like or construction-style plastics.
- ABS is common in sturdy, rigid accessories and housings.
Step 3: If you can’t identify it, assume it’s “difficult plastic”
If your piece feels slick/waxy or flexes easily, treat it like PP:
- extra-deep cleaning
- scuffing
- adhesion promoter
- patient curing time
That conservative approach is exactly how you prep plastic for spray paint without peeling when you’re not 100% sure what plastic you have.
Cleaning & Degreasing (What Actually Works)
Cleaning is where most DIY paint jobs fail because people “wipe it down” and start painting. For plastic, you need a system, not a vibe.
The 2-stage cleaning method that works
Stage A: Wash (removes water-soluble grime)
- Rinse the item with warm water.
- Scrub with dish soap and a non-scratch sponge.
- Rinse thoroughly.
- Dry fully (air dry is best; water trapped in seams ruins adhesion).
Stage B: Degrease (removes oils and residues)
Choose one:
- 70–91% isopropyl alcohol on a lint-free cloth (good general option)
- a dedicated degreaser/prep solvent (best for “mystery gunk” and heavy handling)
When degreasing:
- wipe in one direction
- flip to a clean cloth side often
- don’t touch the surface with bare fingers afterward
Pro tip: The “water break test”
After cleaning and rinsing, run a thin sheet of water over the surface:
- If water beads up into droplets, oils may still be present.
- If water sheets evenly, you’re closer to paint-ready.
(Do this before final drying/scuffing, not right before spraying.)
Avoid these common cleaning mistakes
- Glass cleaner with additives (can leave residues depending on formula)
- Overusing dish soap without rinsing fully (soap film can be a problem)
- “Magic eraser” as a shortcut (it can work as a scuffer, but it can also leave micro-residue; if you use it, rinse well and degrease afterward)
Sanding vs Scuff Pads
This is the step that gives paint something to hold onto without it, even good paint can peel off like a sticker.
When to sand
Sanding is best when:
- the plastic is glossy
- the piece will be handled frequently (tongs, handles, label clips)
- you need to level imperfections or old peeling paint
Beginner-friendly sanding grit:
- 400–600 grit for most plastics (enough tooth without deep scratches)
- if the surface is very slick, start at 320–400 and finish at 600
Use light pressure. Your goal is dull and uniformly scuffed, not gouged.
When scuff pads are better
Scuff pads (like Scotch-Brite style) are perfect for:
- curves, grooves, texture
- small accessories (especially common in trending charcuterie board accessories)
- quick, even “tooth” without sanding lines
They also reduce the risk of sanding through edges or leaving sharp scratch patterns.
Which one should you choose?
Use this quick rule:
- Flat + glossy → sanding (400–600)
- Curvy/ textured / detailed → scuff pad
- High-handling items → scuff + adhesion promoter (best combo)
After scuffing: remove the dust properly
This part matters more than people think:
- Brush off heavy dust (or vacuum gently).
- Wipe with a clean dry microfiber.
- Do a final wipe with a tack cloth just before spraying.
A tack cloth is designed to pick up fine dust and debris right before finishing.
Best Products to Prevent Peeling
If you want the best chance of a durable finish especially on PP or unknown plastics this is where you win.
1) Adhesion promoter (the “secret weapon” for plastic)
An adhesion promoter is a clear tie-coat made specifically to help paint bond to plastics that normally reject it. Rust-Oleum describes its adhesion promoter as a fast-drying clear primer that helps paint adhere to polyolefin plastics and similar surfaces.
Bulldog Adhesion Promoter is also marketed as a product designed to promote paint adhesion to many plastics and synthetic surfaces.
How to use it (general best practice):
- Apply after cleaning + scuffing + dust removal.
- Spray a light, even coat (don’t flood it).
- Follow the product’s recoat window (this is critical).
2) Plastic-bonding spray paints (helpful, not magic)
Some spray paints are formulated to bond strongly to difficult surfaces including plastics. For example, Krylon markets Fusion All-In-One as bonding with stronger adhesion to plastics and other “difficult surfaces,” sometimes without sanding or priming (per their product claims).
Real-world tip: even with “no prep” paints, light scuffing + cleaning still improves durability especially for handled accessories and edges.
3) Primer vs adhesion promoter: don’t mix them up
- Adhesion promoter = helps paint stick to plastic (tie coat)
- Primer = builds a uniform base, helps fill, improves topcoat appearance
On tough plastics like PP, you typically want a promoter first, then your paint system as directed.
4) The dust-control trio (low cost, high impact)
If you want a smooth finish and fewer peeling edges later:
- scuff to create tooth
- remove dust thoroughly
- tack cloth immediately before spraying
Dust trapped under paint can create weak spots that lift when bumped or flexed.
Final Prep Checklist
Use this checklist every time you want to know how to prep plastic for spray paint without peeling, especially if you’re painting small, trendy serving pieces.
1) Decide what you should (and shouldn’t) paint
For trending charcuterie board accessories, paint only:
- handles (non-food-contact areas)
- decorative stands/risers
- label holders (not the part touching food)
- utensil handles (not the serving end)
Avoid painting:
- bowls/ramekins interior
- cutting surfaces
- anything that will touch oily/wet foods
2) Clean correctly (wash + degrease)
- Wash with dish soap, rinse well, dry fully
- Degrease with alcohol or a dedicated degreaser
- Don’t touch the surface afterward
3) Scuff for adhesion
Pick one:
- sand 400–600 grit until uniformly dull
- or use scuff pads for curves/textures
4) Remove dust like a finisher
- wipe off dust
- tack cloth right before spraying (light pressure)
5) Use adhesion promoter on hard plastics
If it’s PP (#5), unknown, flexible, or slick-feeling:
- use an adhesion promoter
- follow its recoat window strictly
6) Spray paint the smart way (so prep doesn’t go to waste)
Even perfect prep can fail if spraying is sloppy:
- light coats beat heavy coats
- keep consistent distance
- let each coat flash off before the next
- avoid spraying in high humidity or cold conditions
7) Cure time (the step people skip)
- “Dry to touch” is not “ready to use”
- let it cure as long as the can recommends
- longer curing = harder finish = less chipping on handled items
Putting It All Together (Fast Example for Small Accessories)
Let’s say you’re repainting a set of plastic mini tongs and label holders classic trending charcuterie board accessories.
- Wash + rinse + dry
- Degrease (don’t touch after)
- Scuff pads on curves, 600 grit on flat spots
- Remove dust + tack cloth
- Light coat adhesion promoter (especially if it’s PP #5)
- 2–4 light color coats
- Let cure fully before using
That’s the repeatable formula for how to prep plastic for spray paint without peeling and it works because it respects the two things plastic demands: clean surface energy + mechanical/chemical adhesion.
Quick Safety Note:
Most spray paints are not food-safe. Paint only non-food-contact parts like handles, stands, label holders, or risers. Avoid surfaces that touch wet or greasy foods (cheese, fruit, meats), and allow paint to fully cure per the manufacturer’s instructions.